Photographing Space Station Transits of the Sun and Moon with PlanIt Earth
Find ISS and CSS transits of the Sun and Moon, choose a camera position, compare orbital predictions, and rehearse or automate the shot with PlanIt Earth.
Foreword
Transit Finder was my introduction to predicting space station transits. I still remember my surprise when I learned that you could photograph a space station passing in front of the Sun or Moon.
Years ago, people suggested adding transit predictions to PlanIt Pro. I held off. I try to build features only when I have something meaningfully new to offer, and Transit Finder already did a fine job.
As I spent more time shooting transits, I began thinking about everything that happens after you find one. How do you pick a camera position, frame the shot in advance, rehearse it, and capture the crossing itself? Those practical questions shaped the transit workflow in PlanIt Earth. I'm proud of how much of the shoot it now brings together, from choosing a spot on the map to triggering a compatible camera at the predicted time.
The International Space Station (ISS) and the Chinese Space Station (CSS) can pass in front of the Sun or Moon in a fraction of a second. PlanIt Earth helps you find nearby events, see where the crossing is visible, plan the composition, and, with a compatible camera, shoot automatically.
Get to know the two space stations
How big are they?
The ISS is an orbiting laboratory built and operated by several nations. Its long truss and rows of solar arrays are its most recognizable features. NASA gives a wingspan of about 109 m, roughly the length of a football field.
The CSS has three main modules in a T-shaped configuration: the Tianhe core and the Wentian and Mengtian laboratory modules. Each laboratory module carries a pair of large flexible solar wings. Each wing extends about 27 m, giving roughly 55 m across a pair. That is the reference span used here to estimate the station's apparent size. NASA ISS facts and figures · CSS configuration · CSS solar array dimensions
How far is the station from the camera?
Both stations are in low Earth orbit. Take an orbital altitude of 400 km as an example. With the station nearly overhead, the camera-to-station distance is about 400 km. At 30° elevation it is about 740 km, and at 20° it is close to 1,000 km. For your shoot, use the distance shown in the event details for your camera position.
How big is the silhouette against the Sun or Moon?
The Sun and Moon each appear about 0.5° (1,800 arcseconds) across. Divide the station's projected span by its distance, using the same units, to estimate its angular size in radians. If the relevant wingspan is fully visible broadside:
- At 400 km, the ISS spans about 56 arcseconds, or 3.1% of the disc diameter. The CSS spans about 28 arcseconds, or 1.6%.
- At 1,000 km, the ISS spans about 22 arcseconds, or 1.2% of the disc diameter. The CSS spans about 11 arcseconds, or 0.6%.
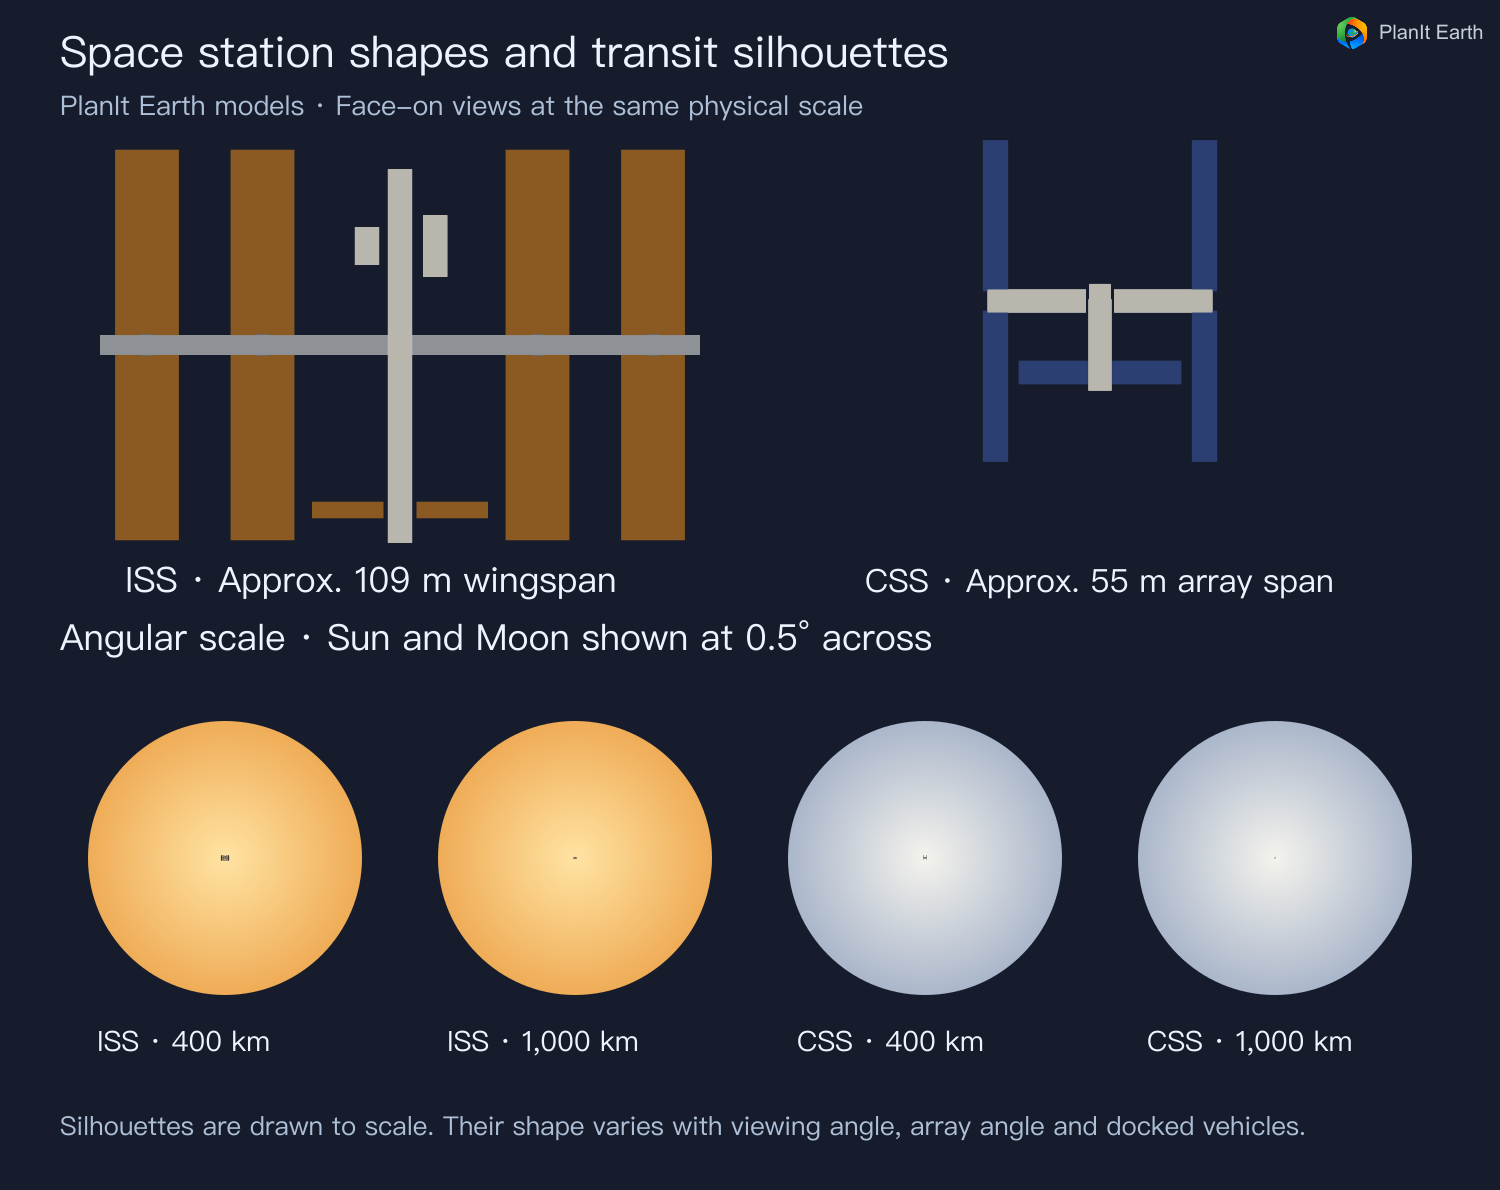
If the solar or lunar disc is 2,000 pixels across in the image, the two stations span roughly 62 and 32 pixels at 400 km, or 25 and 13 pixels at 1,000 km. The projected shape depends on viewing direction, solar array orientation and docked vehicles. NASA Goddard photography reference
Choose a focal length
On full frame, start around 500 mm for the ISS and preferably around 1,000 mm for the CSS if you want a recognizable silhouette. At 400 km, a 6,000-pixel-wide full-frame image gives about 23 pixels across the reference wingspan in either example. A longer distance, an edge-on view or a lower-resolution recording mode can reduce the detail you capture. Check the planned framing to make sure the disc and the part of the track you want to photograph fit.
The screenshots show example predictions in the English app. The shooting controls show a demo camera connection.
1. Open Satellite Transit
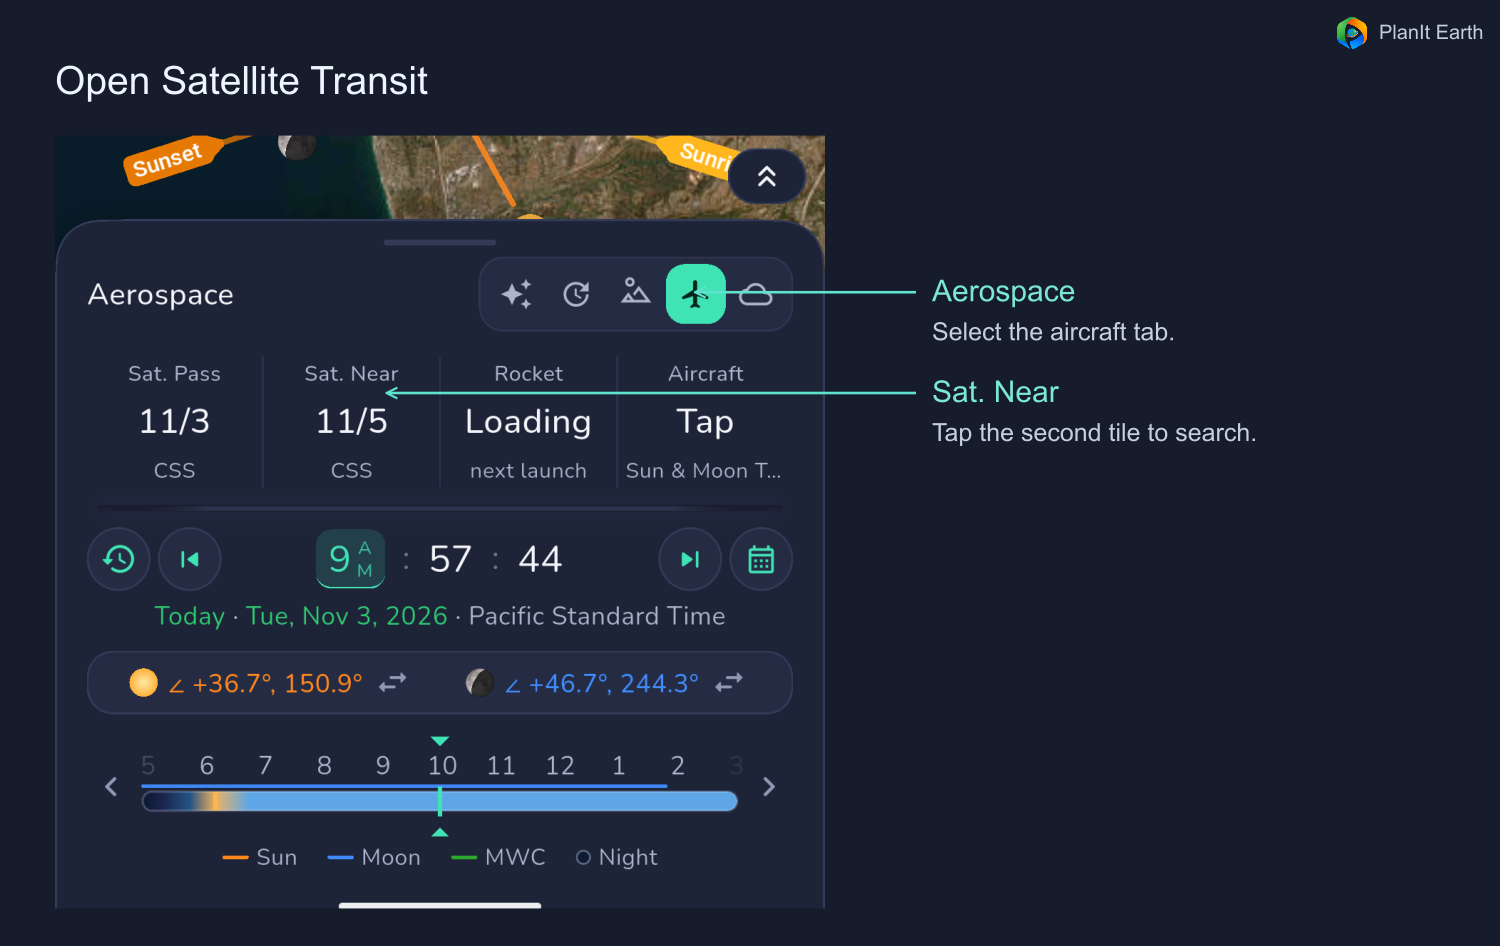
Expand the date and time panel below the main map, switch to Aerospace, and tap the Sat. Near tile. Move the map to the region where you plan to shoot and check the camera pin if you already placed one. The camera pin represents the shooting position. Search within a radius you can realistically travel, then refine the position on the map.
2. Set up the search
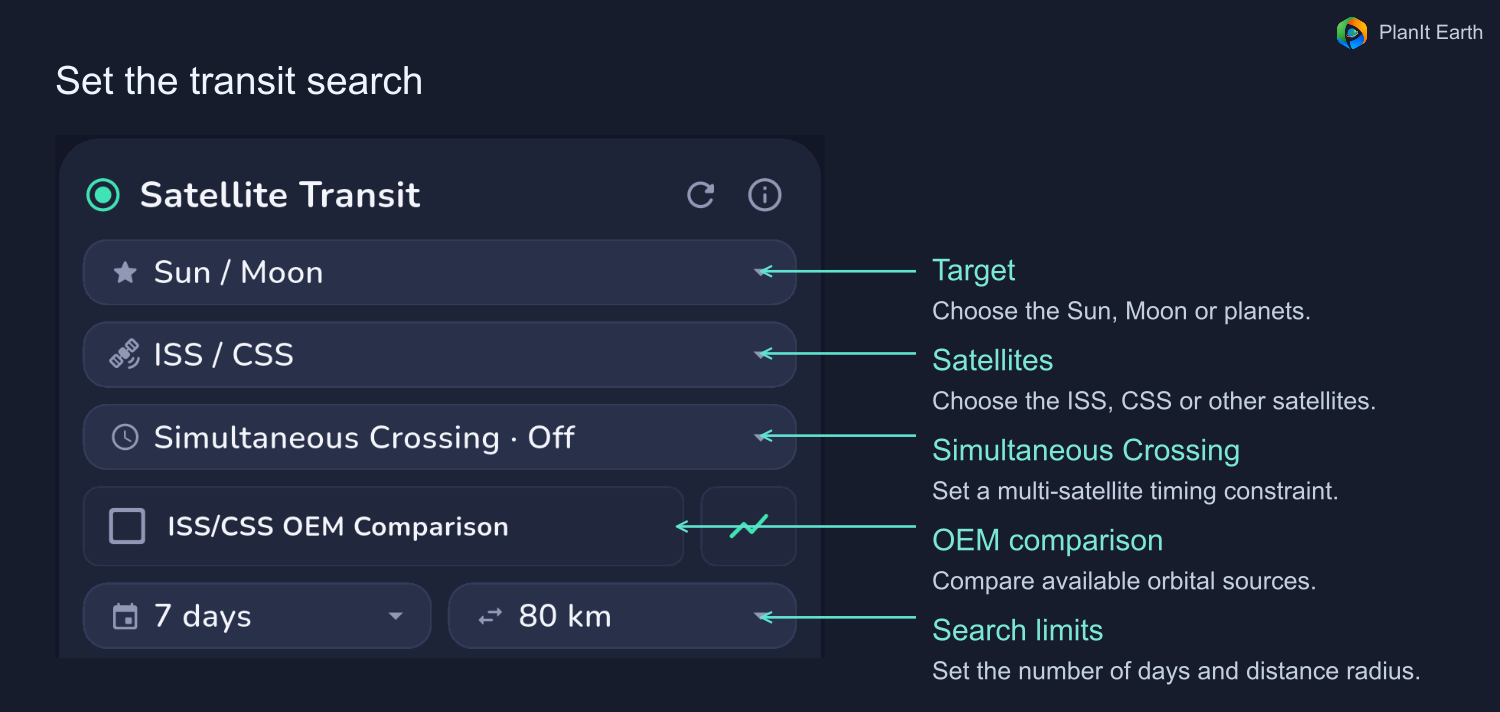
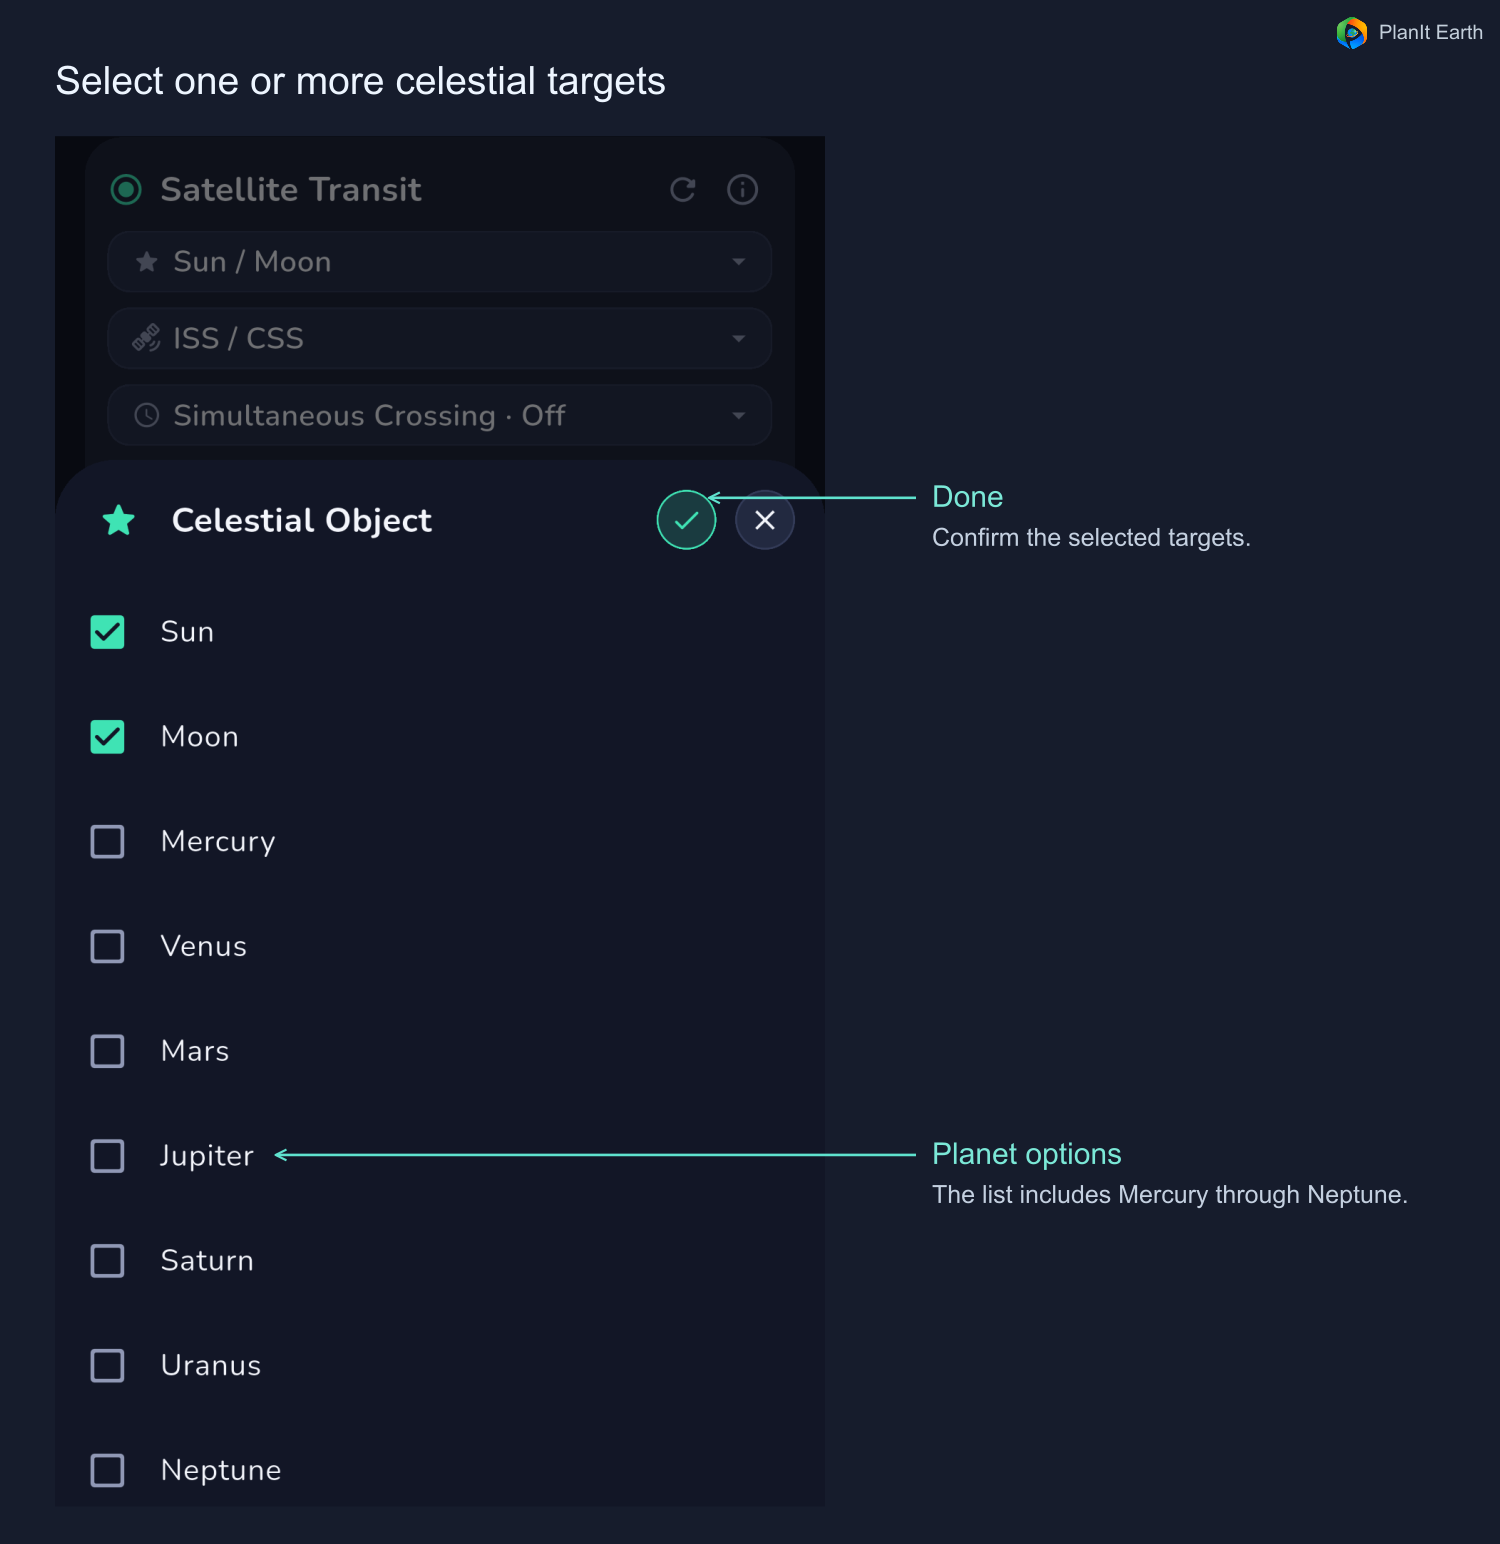
- Target. Tap the Sun/Moon selector to open the list. You can also choose Mercury, Venus, Mars, Jupiter, Saturn, Uranus or Neptune. Select one or more targets and tap the checkmark to finish.
- Satellite. Choose the ISS, CSS or another satellite. Selecting one station keeps the list simpler.
- Days. Search 3, 7, 14, 30 or 45 days ahead.
- Distance radius. Set how far you are prepared to travel from the search location. The map shows the width of each actual transit corridor separately.
- Refresh and information. Refresh requests updated orbit data and recalculates the search. If a source is unavailable, check the status and data age. The information button opens the feature help.
Enable ISS/CSS OEM Comparison to compare standard TLE predictions with available OEM-based results. Direct OEM data applies within its coverage window. Depending on availability, the app can show fitted OEM, ordinary TLE or an unavailable status. Read the source label on each result. The graph button shows orbital altitude and data coverage.
When several satellites are selected, the simultaneous-transit option looks for crossings of the same target at the same time from a common site. A time-window option allows successive crossings from that site within the chosen interval. Leave this setting off when looking for one station. The unlimited-distance setting belongs to the corresponding multi-satellite search.
3. Read the results
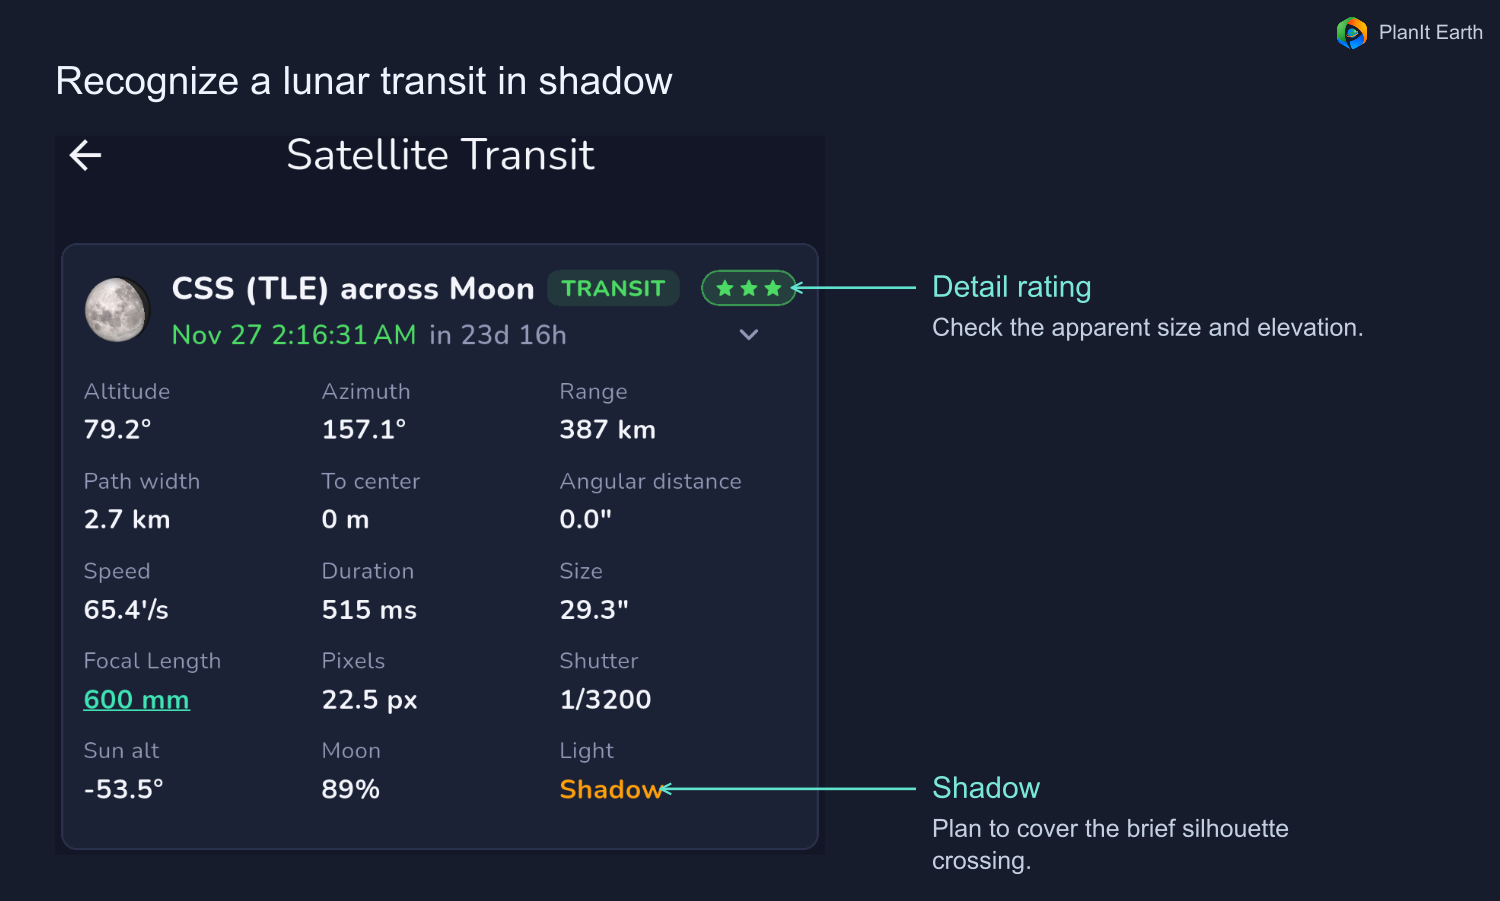
Check the date and status first. The list can contain events that have already occurred. A transit crosses the disc from the specified position. A near pass may lead to a transit if you move into the mapped corridor.
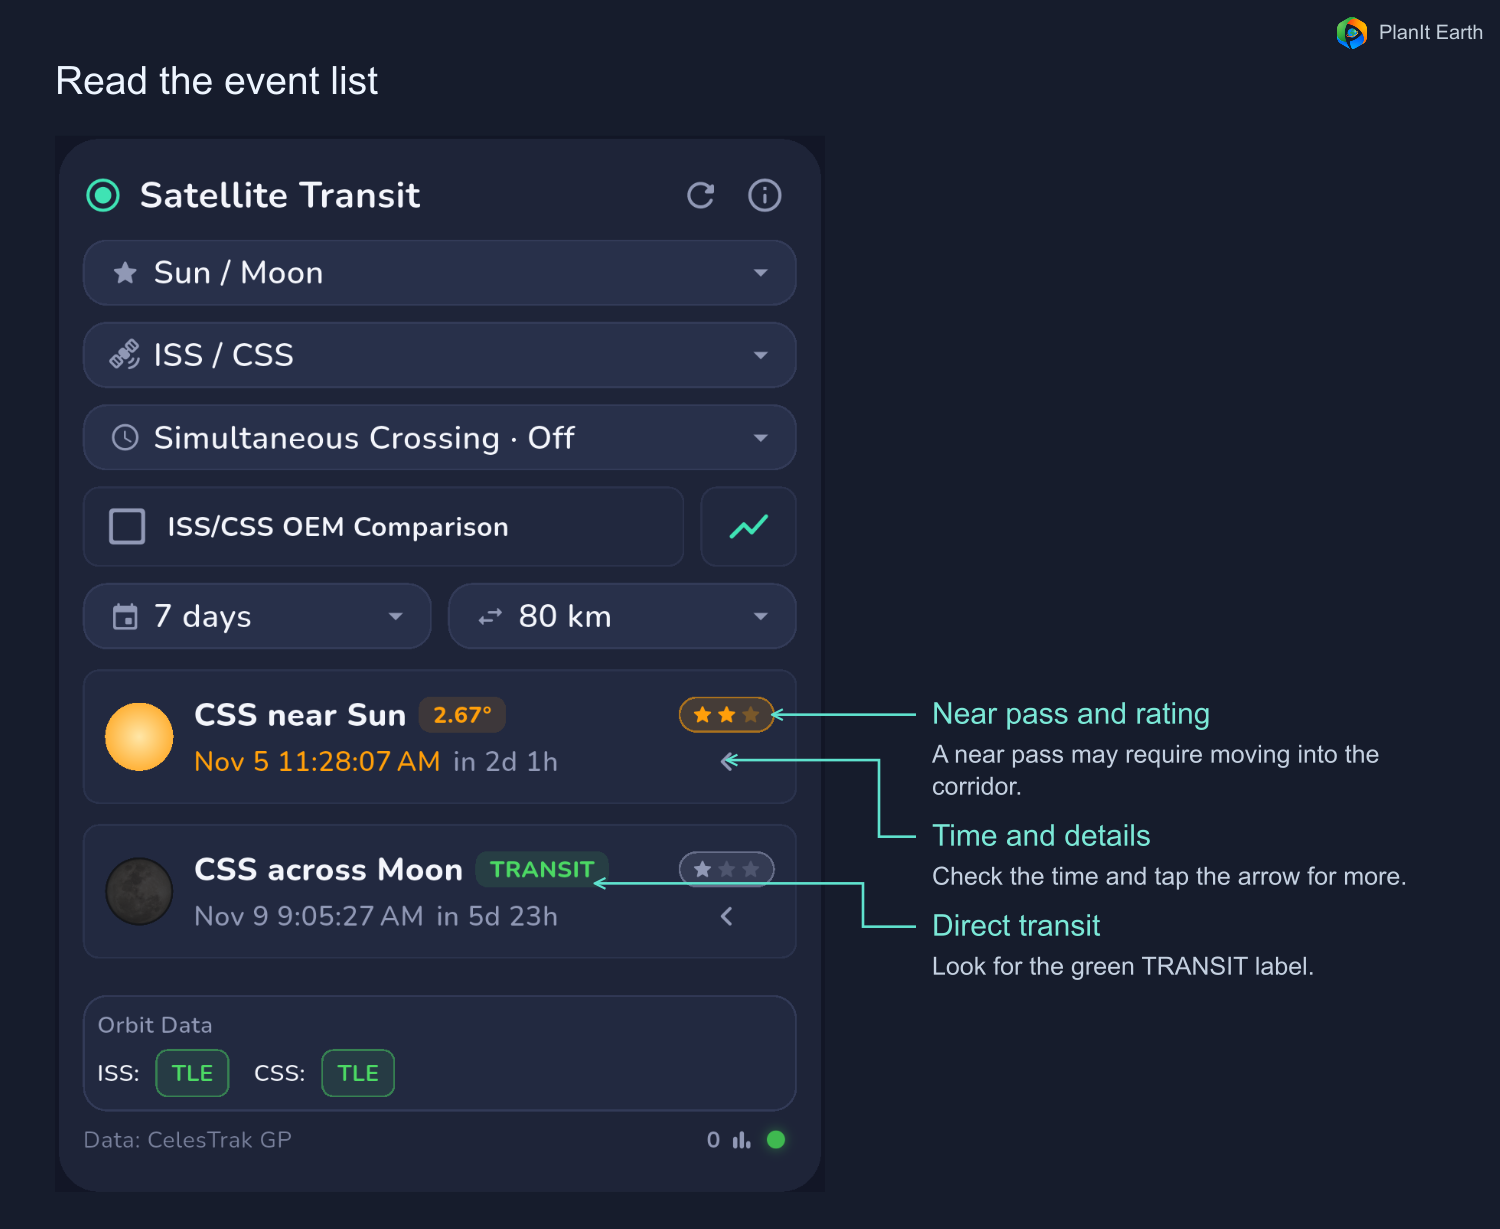
Tap the event to open its map or expand its details with the arrow. Compare the same pass and target across orbit sources.
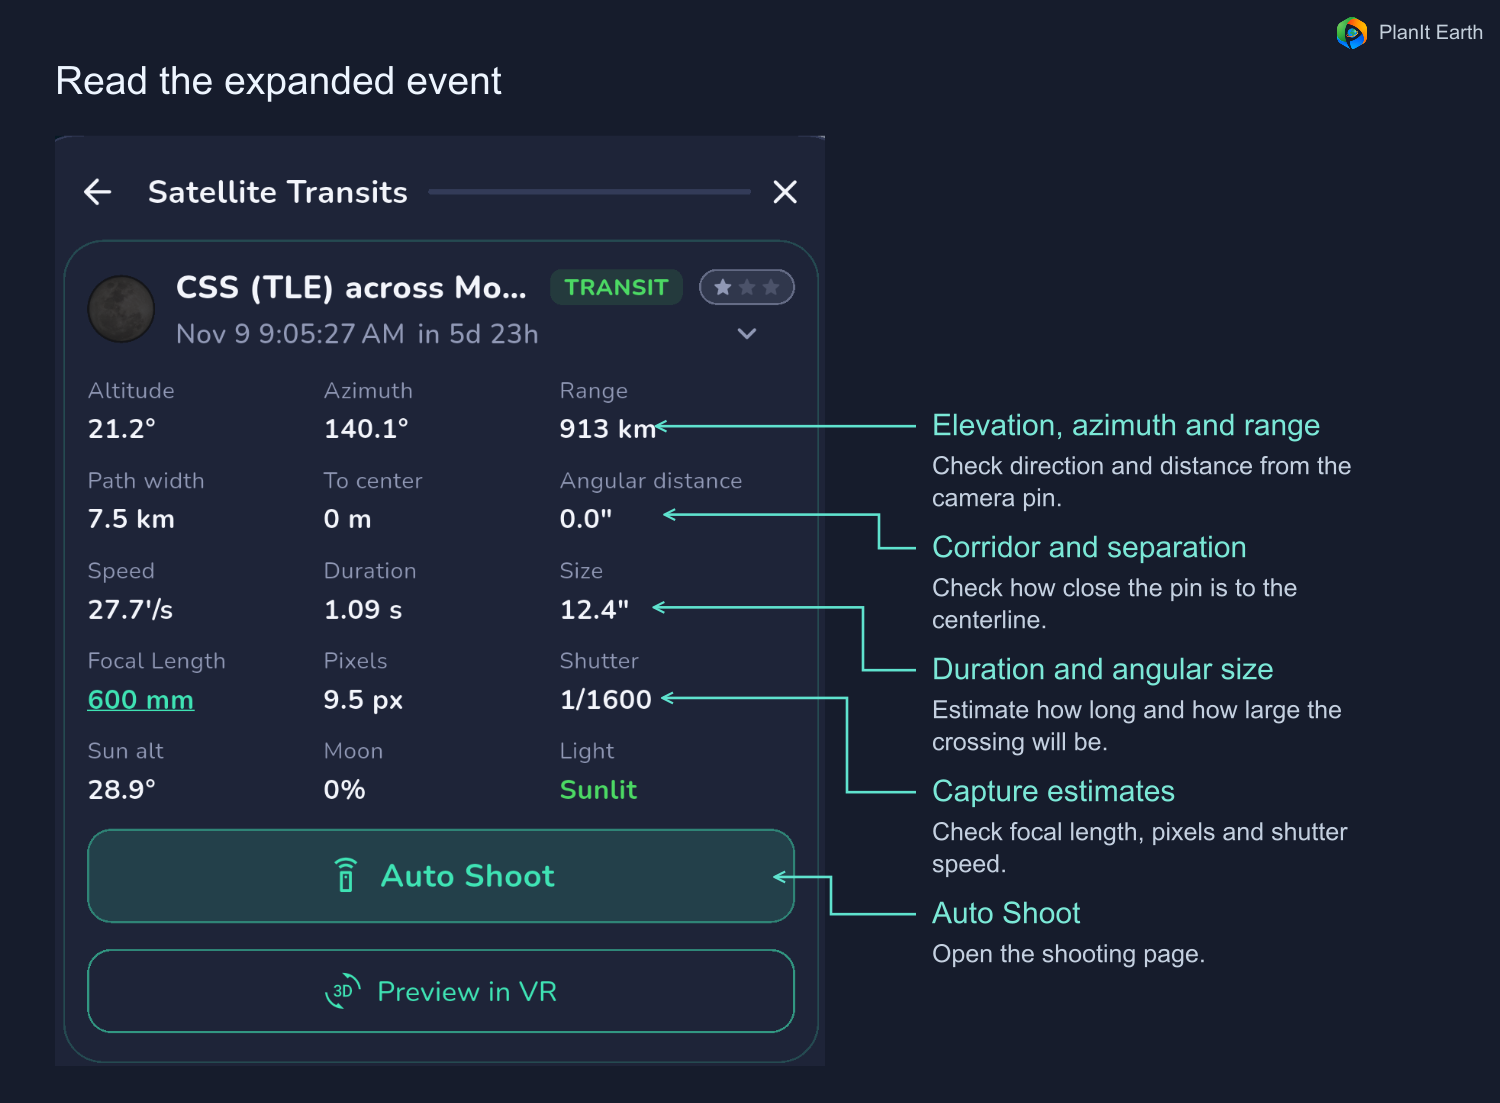
- Time and countdown. Confirm the local date and time. Use the capture window on the shooting page for the duration of the burst or recording.
- Elevation, azimuth and range. Check how high the target will be, which way to point and how far away the station is.
- Corridor width, distance to centerline and angular separation. These show where your position lies relative to the predicted crossing.
- Duration and apparent size. A short crossing leaves little time to capture frames. A smaller station takes up fewer pixels.
- Focal length, estimated pixels and suggested shutter speed. Enter your actual focal length to assess image scale and motion blur. Pixel estimates also depend on the camera and capture mode. Below about 15 pixels across, the silhouette is very small and solar arrays or modules are hard to distinguish. If structural detail is your goal, that usually makes a dedicated trip less worthwhile. You can still photograph the crossing as an event. Set and verify the shutter speed on your equipment.
The stars summarize the potential for detail. One star means the station may appear as a dot or soft outline. Two stars suggest a recognizable silhouette. Three stars indicate better conditions for resolving features such as arrays and modules. The app considers apparent size and elevation. Higher passes often bring the station closer and reduce the amount of atmosphere you shoot through. Check weather, focus and shutter speed separately.
4. Pick the camera position on the map
Open an event to see its corridor and centerline. The map distinguishes solar and lunar events by color. When comparing orbit sources, use the legend to identify each path.
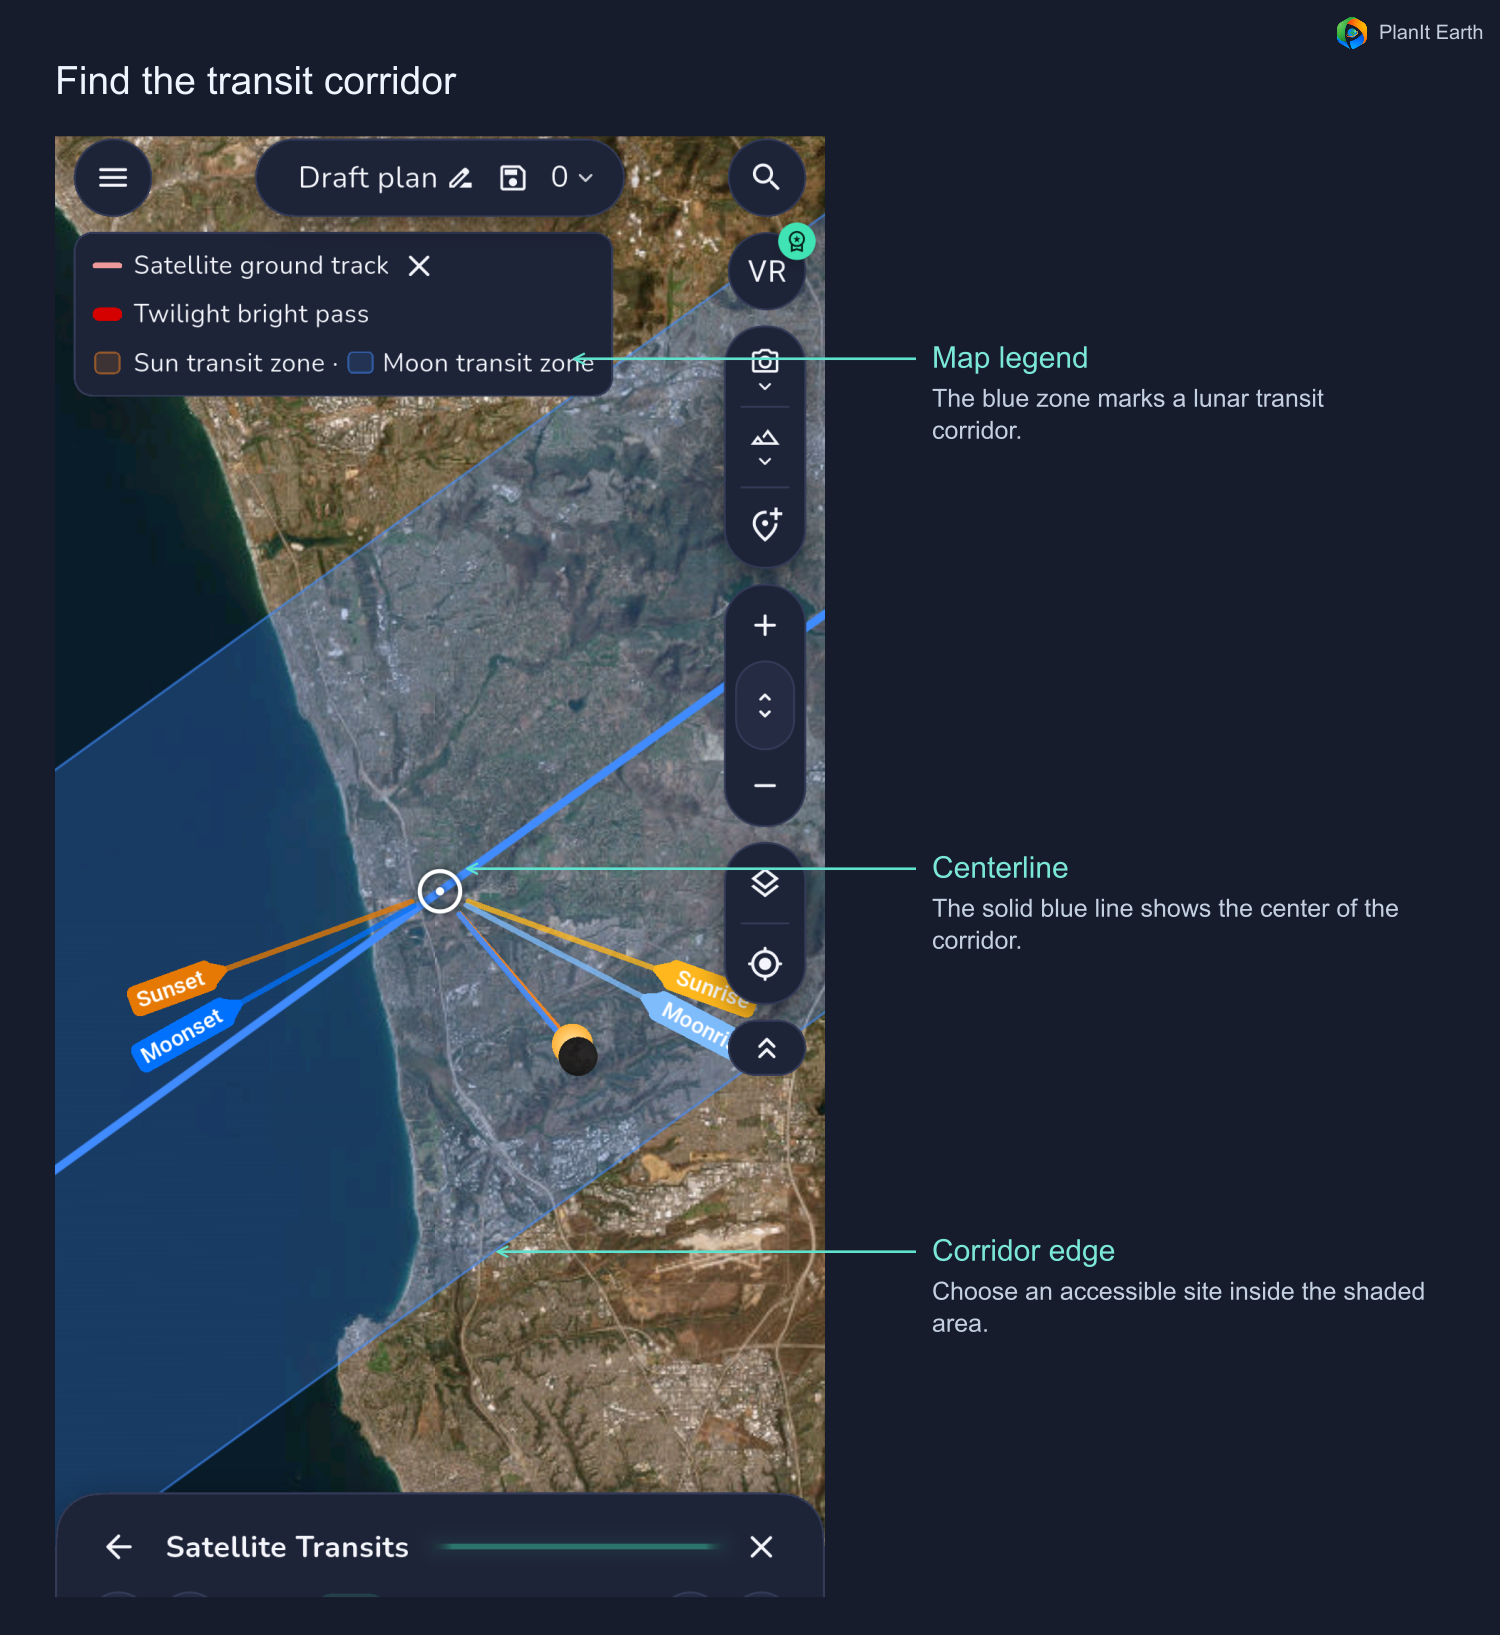
Place or move the camera pin and check the predicted time, distance to the centerline and angular separation from that position. Consider safe access, permission to stop, and trees or buildings along the sight line. Panning the map leaves the existing search location and camera pin in place. Check both before entering the shooting page.
Open the VR preview to see the direction, field of view and station track at the chosen time. Check the real horizon and obstructions on site.
5. Compare TLE and OEM predictions
- TLE. The standard orbital elements the app propagates for its baseline prediction.
- Direct OEM. Official time-tagged positions and velocities. The ISS data comes from NASA and the CSS data from China's crewed space program. Direct OEM applies within the supplied time span.
- Fitted OEM. Supplemental elements fitted by CelesTrak to official OEM ephemerides. The app propagates these fitted elements.
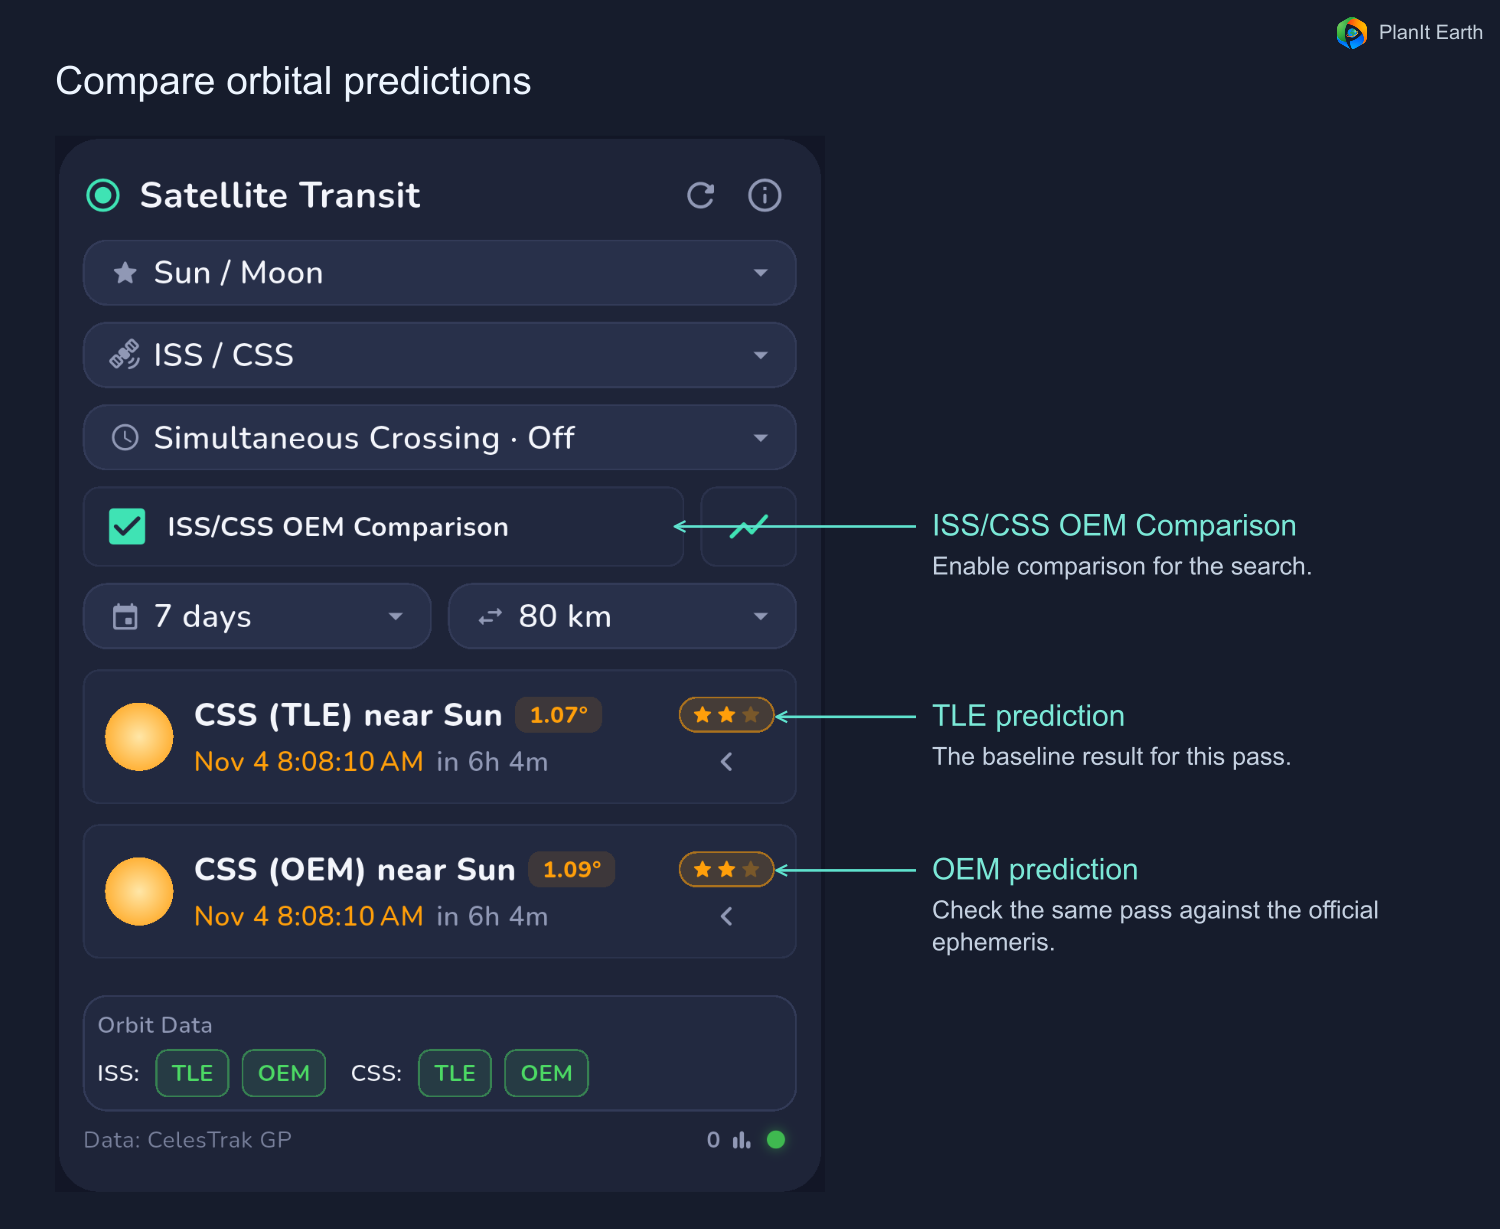
For solar and lunar transits, use Direct OEM as your first reference for camera placement when the latest official ephemeris covers the event. It provides the operator’s predicted positions and velocities directly. Standard TLE and Fitted OEM both use SGP4 propagation. Which of those two is more accurate depends on how recently the data were updated and how far the event is from the element epoch. Refresh the prediction close to the shoot. If the centerlines differ substantially, check the orbit source, coverage window and camera location again.
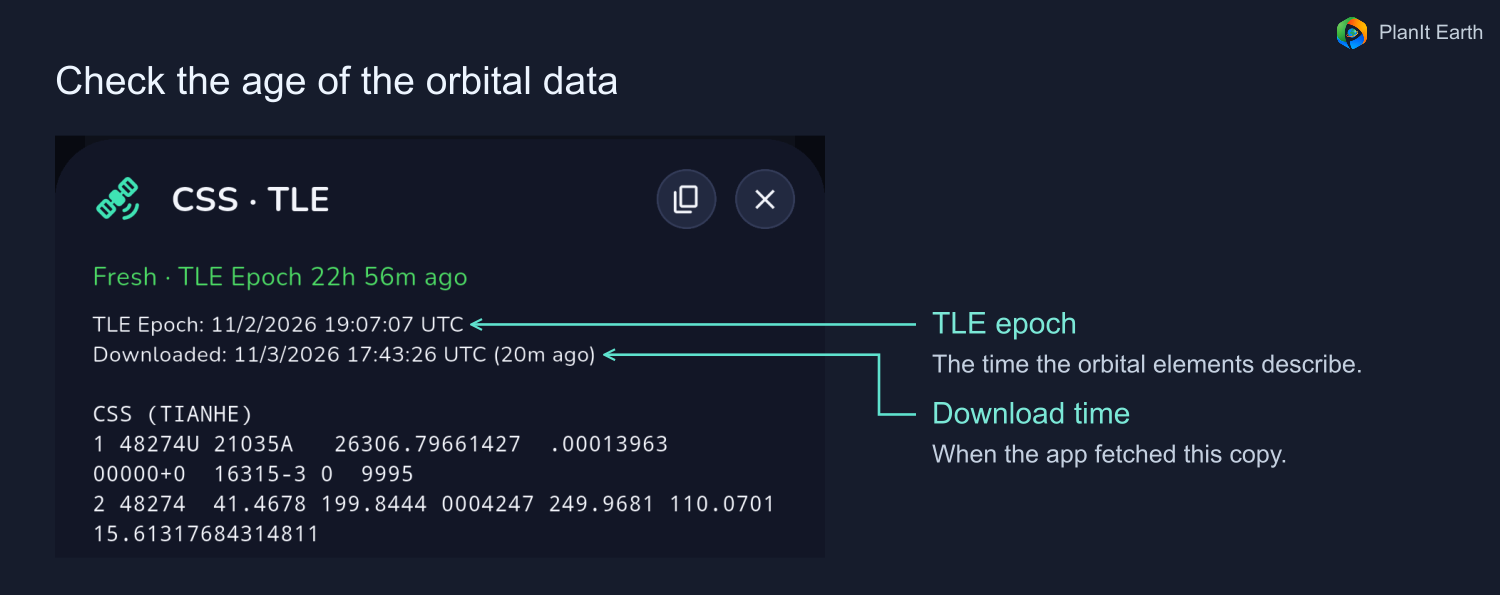
For TLEs, check the epoch of the elements. For direct OEM, verify that the coverage includes the event. Recently downloaded data can still have an older epoch. Switch the source tabs for the same event and compare predicted times, angular separation and whether the camera pin lies inside each path.
If the paths overlap at an accessible site, inspect that area first. If they differ substantially, refresh the data and check the epochs, coverage and source status before deciding where to go. On the shooting page, allow enough recording time to cover a plausible difference in the predicted start time. Extra recording time helps with timing uncertainty. Your camera position determines whether the station actually crosses the disc. CelesTrak supplemental orbital data
6. Set up alerts and camera control
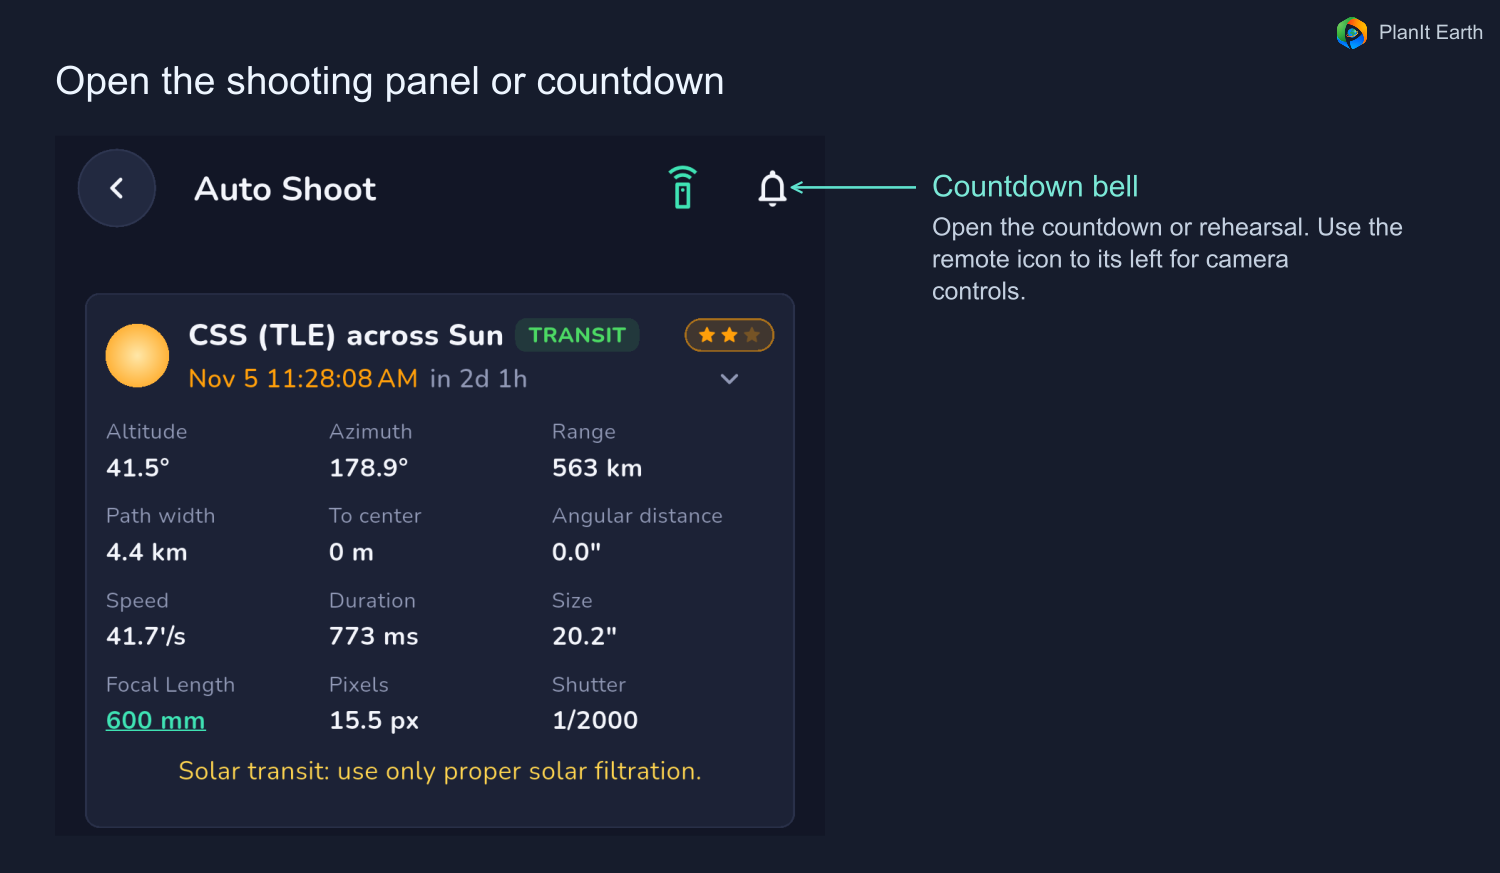
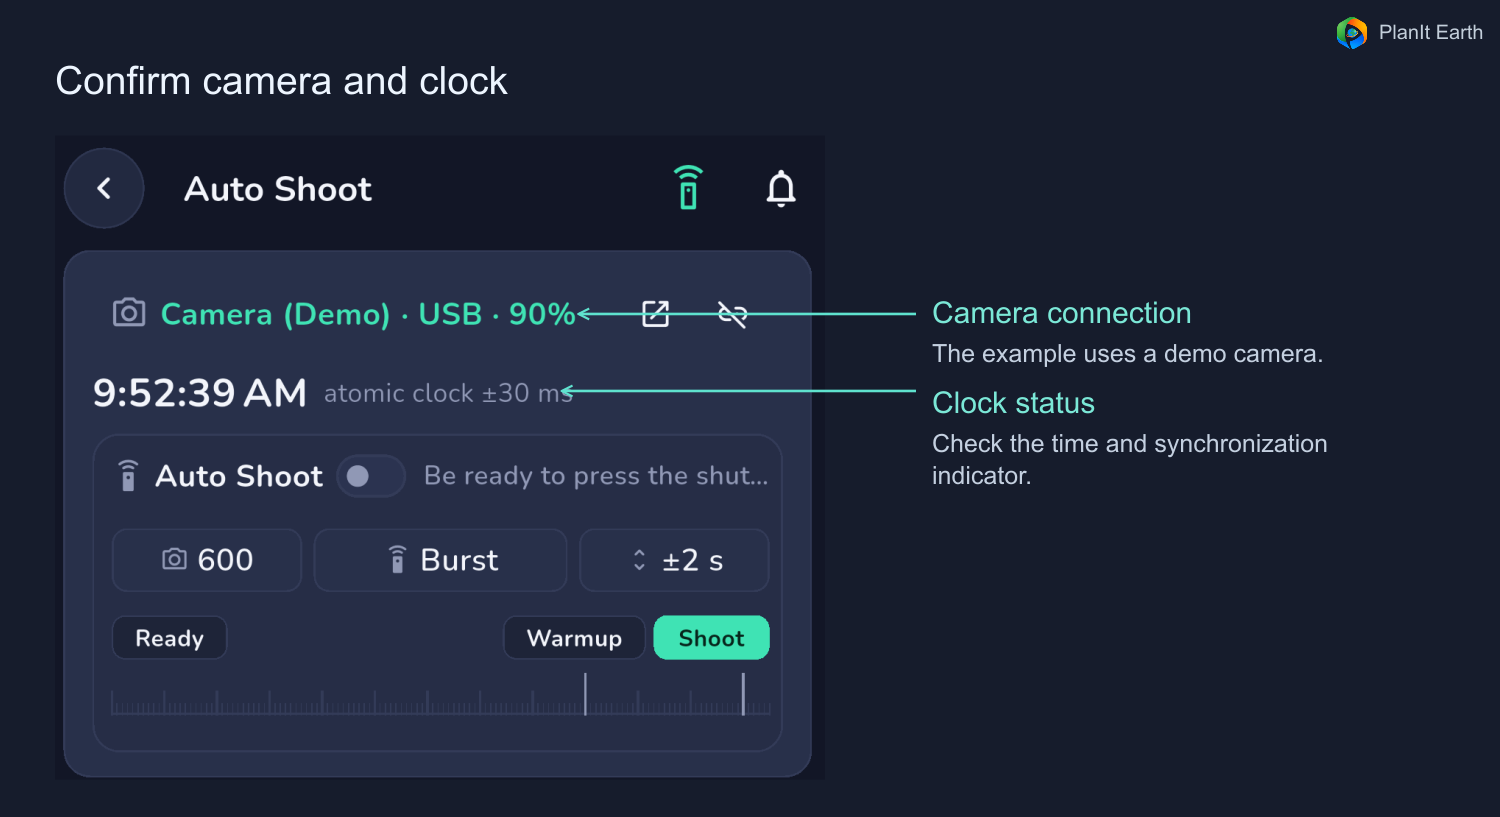
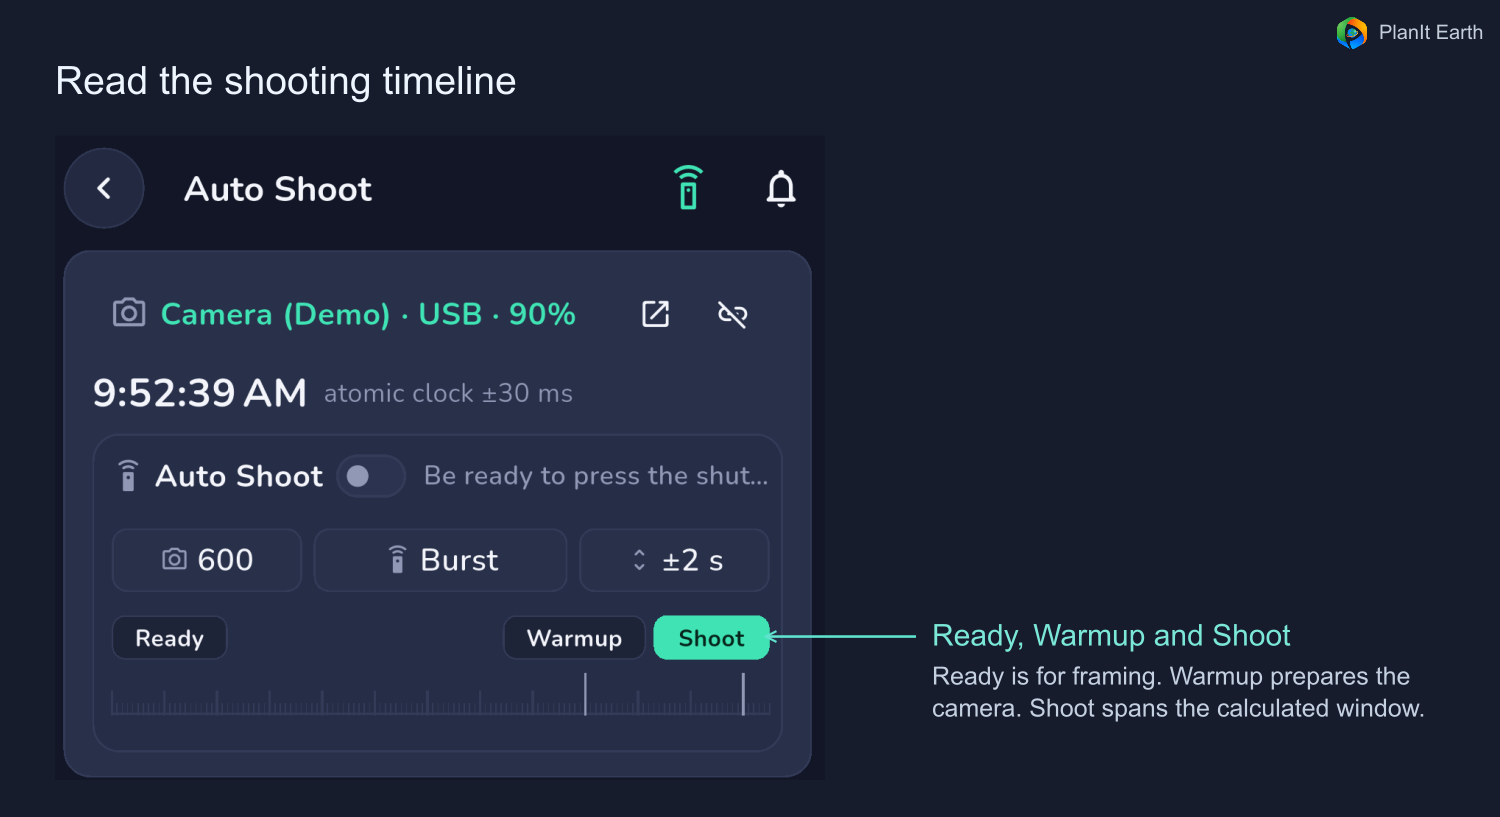
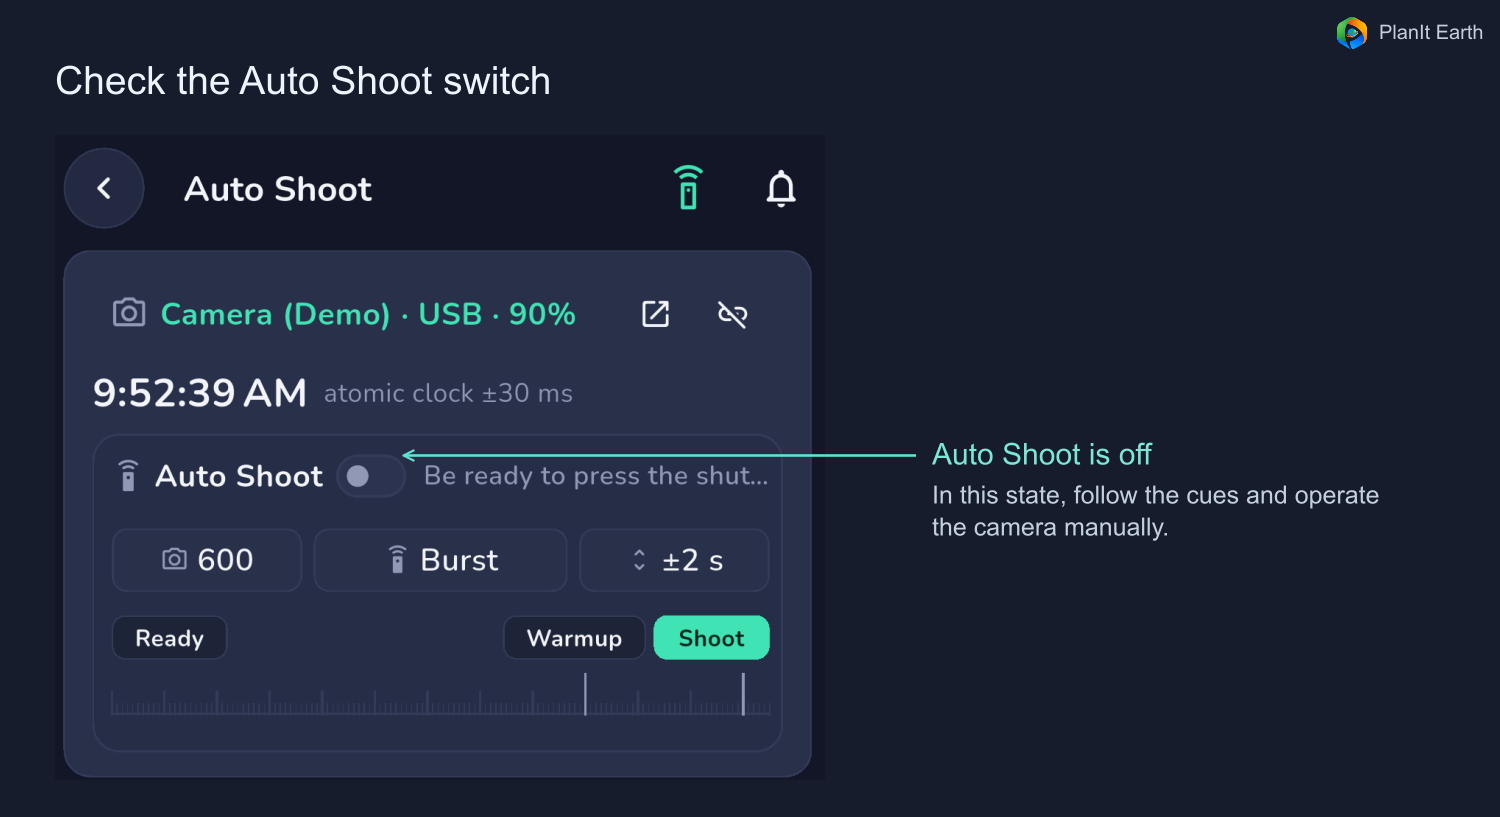
Expand your event and tap Auto Shoot. The remote-control icon opens the shooting panel. The bell opens the countdown or rehearsal options. The Auto Shoot switch determines whether the app operates the connected camera when the time comes. Leave it off for manual shooting with countdown cues, or turn it on after connecting and setting up a compatible camera.
Set focal length, capture mode and padding
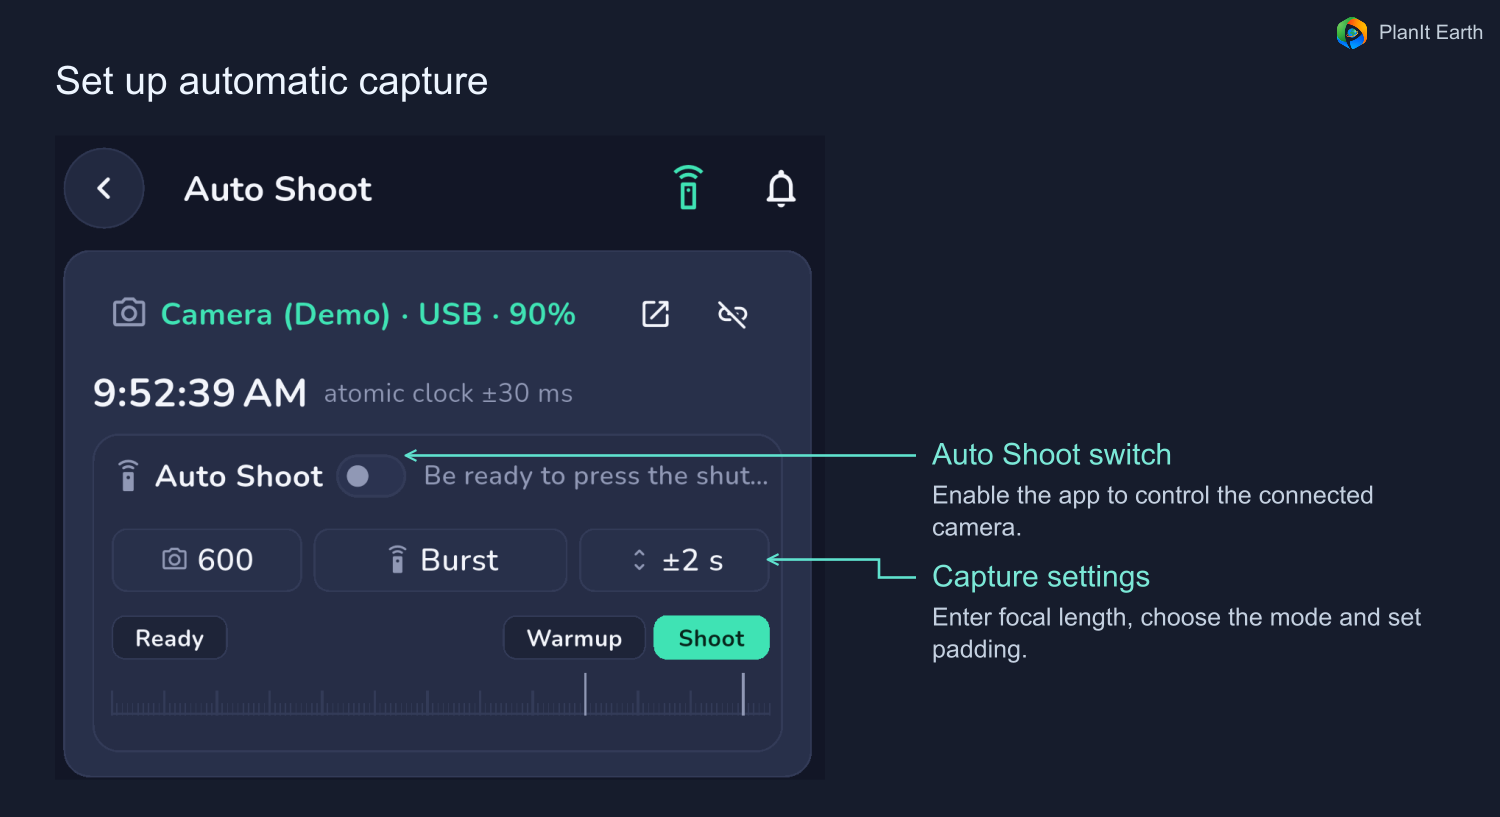
Enter the actual lens or telescope focal length. Select burst or video as supported by your setup. SharpCap may also offer SER. Padding applies to each end of the calculated window, so ±2 seconds adds four seconds total.
For a dark silhouette, the window chiefly covers the disc crossing. A sunlit station during a lunar transit may also be visible outside the disc, so the app can account for the time it spends inside the camera's field of view. Use the displayed capture window to plan how long to record.
The timeline shows Ready, Warmup and Shoot. By default, preparation begins two minutes before capture and warm-up starts 30 seconds before capture. The warm-up falls within the preparation period. The timeline reflects your current settings and updates when you change padding.
Rehearse the shot
- Open Auto Shoot from the event details. For a real test capture, connect the camera, select the focal length and mode, set padding, and enable Auto Shoot. You can rehearse the cues with automatic capture off.
- Tap the bell in the upper right. In the countdown dialog, choose Rehearse at the lower left.
- Listen to the countdown and start cues. If Auto Shoot is enabled and the camera is connected, confirm that the burst or recording starts and stops and that files are saved. Check that the burst buffer lasts for the full window.
- Let the rehearsal finish or tap the bell again to stop it early. The time display returns to its previous state.
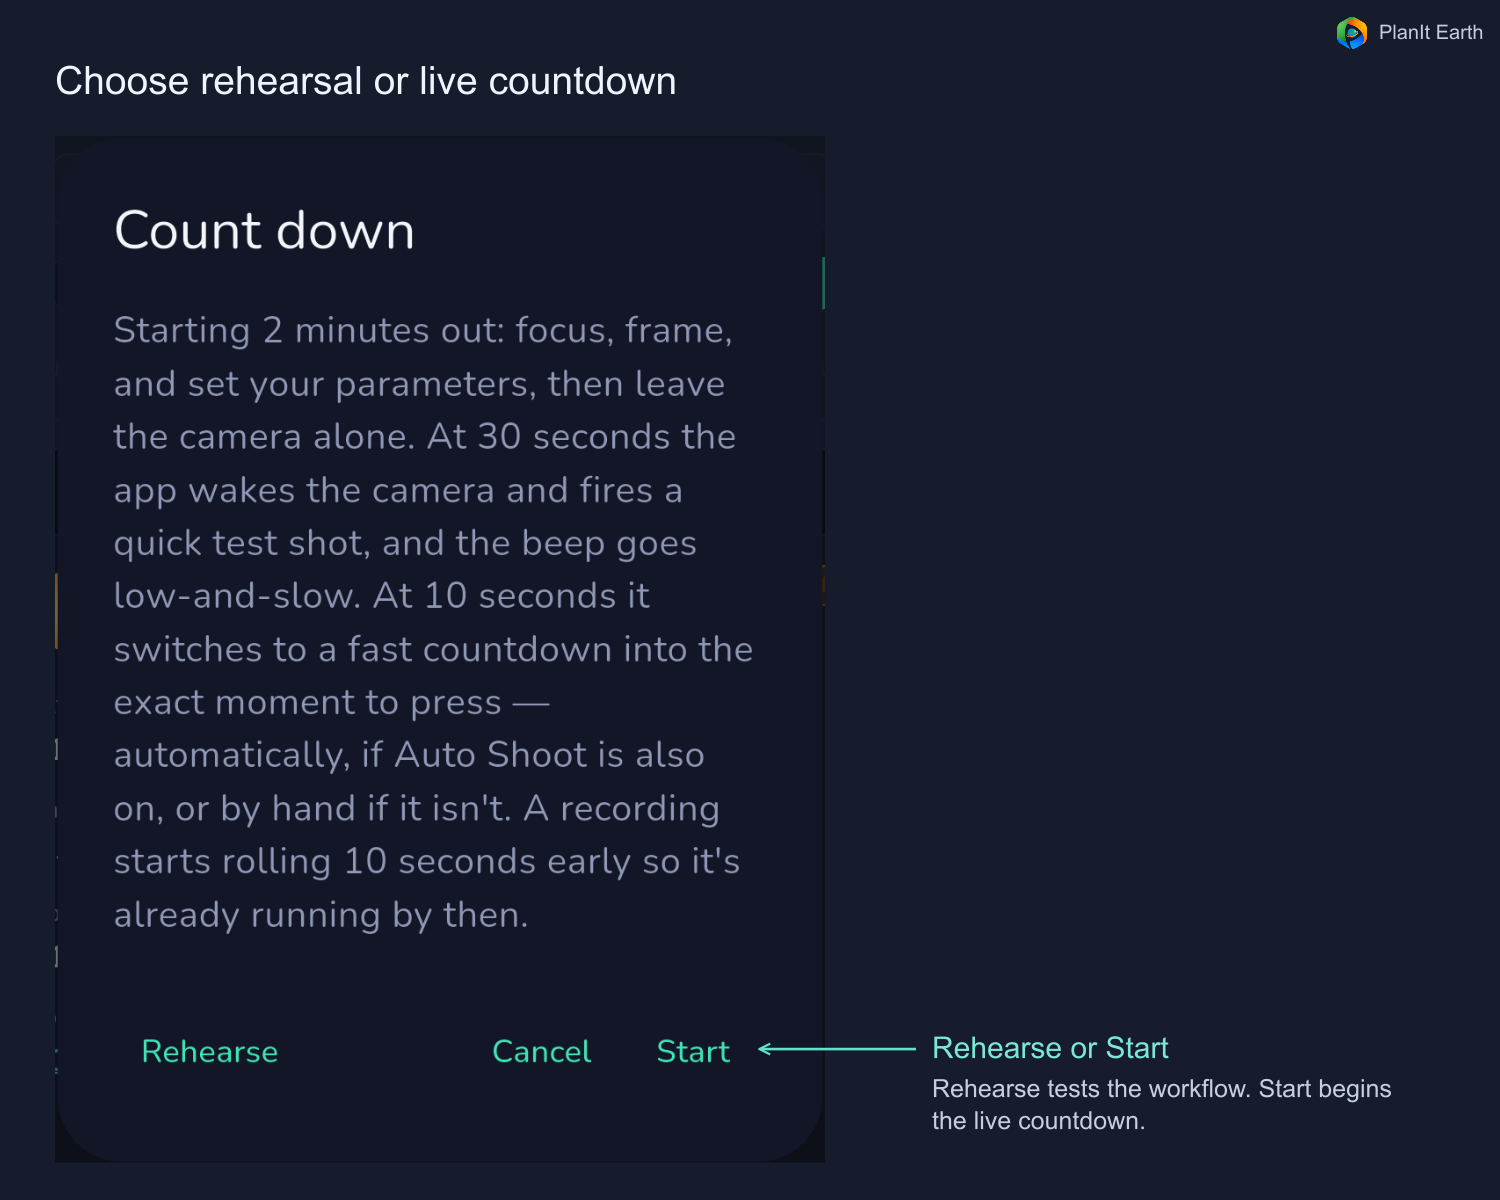
Start the real countdown
Verify the event, real time and camera settings. Tap the bell and choose Start. The Auto Shoot switch controls camera operation during the actual window. Check clock synchronization, volume and battery, and keep the app in the foreground.
7. Frame the target with or without tracking
Scroll to the framing preview on the shooting page. It shows a suggested placement based on your position, focal length and selected phase. Use your camera's live view to confirm framing, focus and exposure.
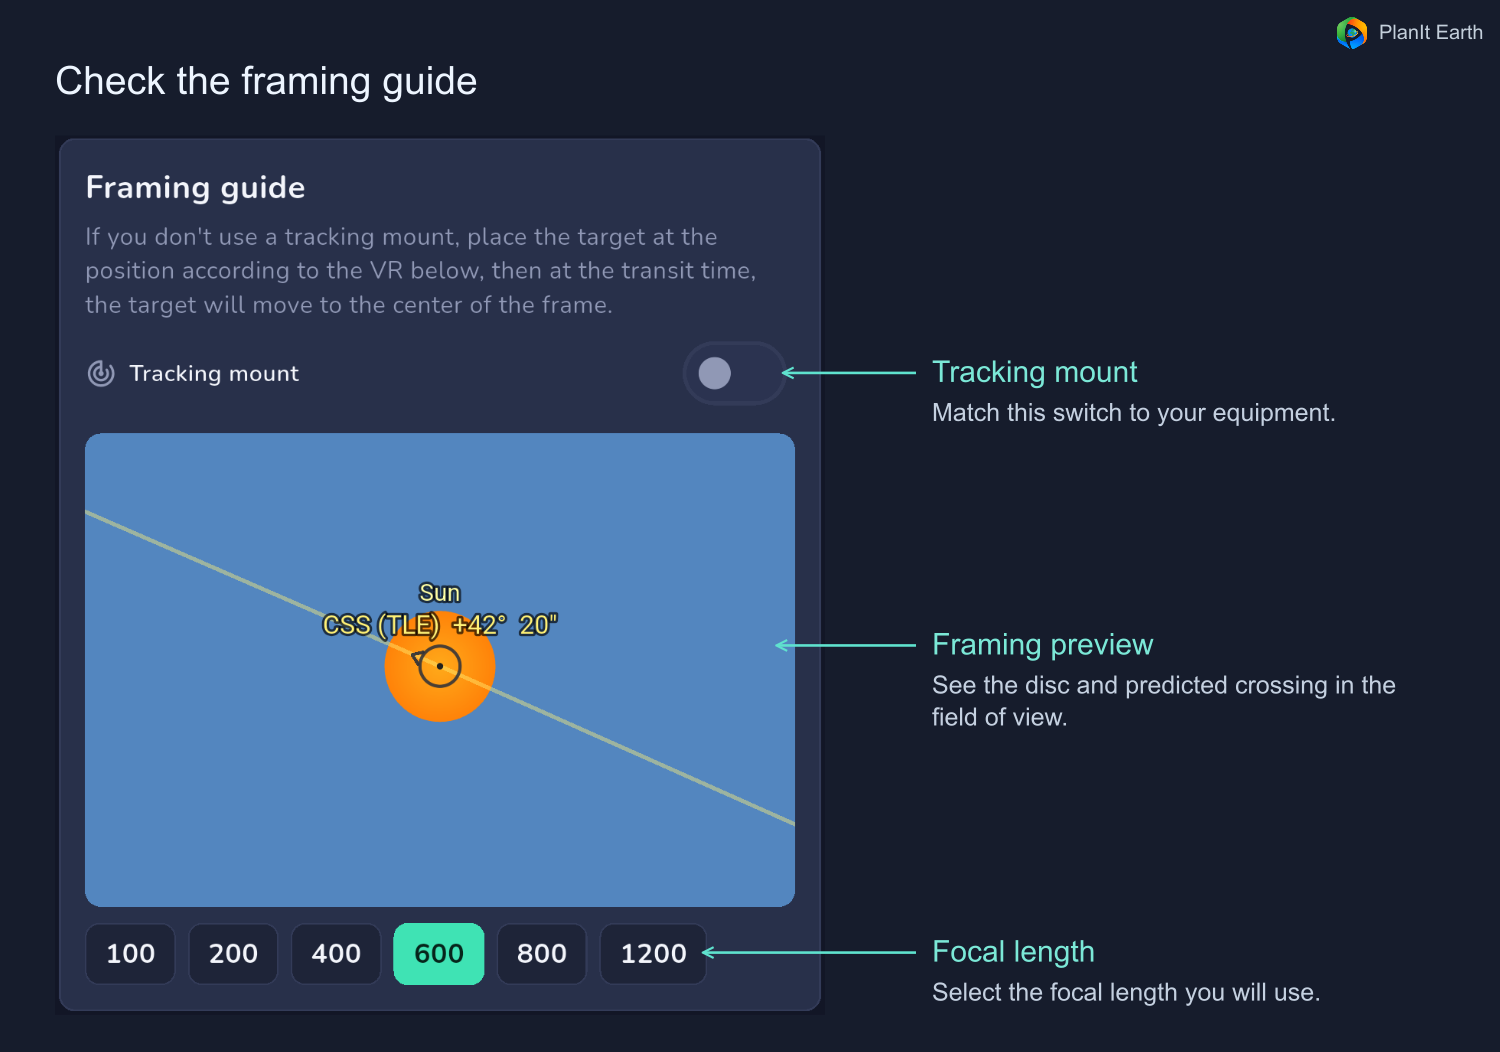
Without tracking, the Sun or Moon drifts across the frame. Leave equatorial tracking off in the app. Tap Ready on the timeline to see where to place the disc early, then tap Shoot to see the intended composition at the event time. Keep the camera pointed as set and let the disc drift into position.
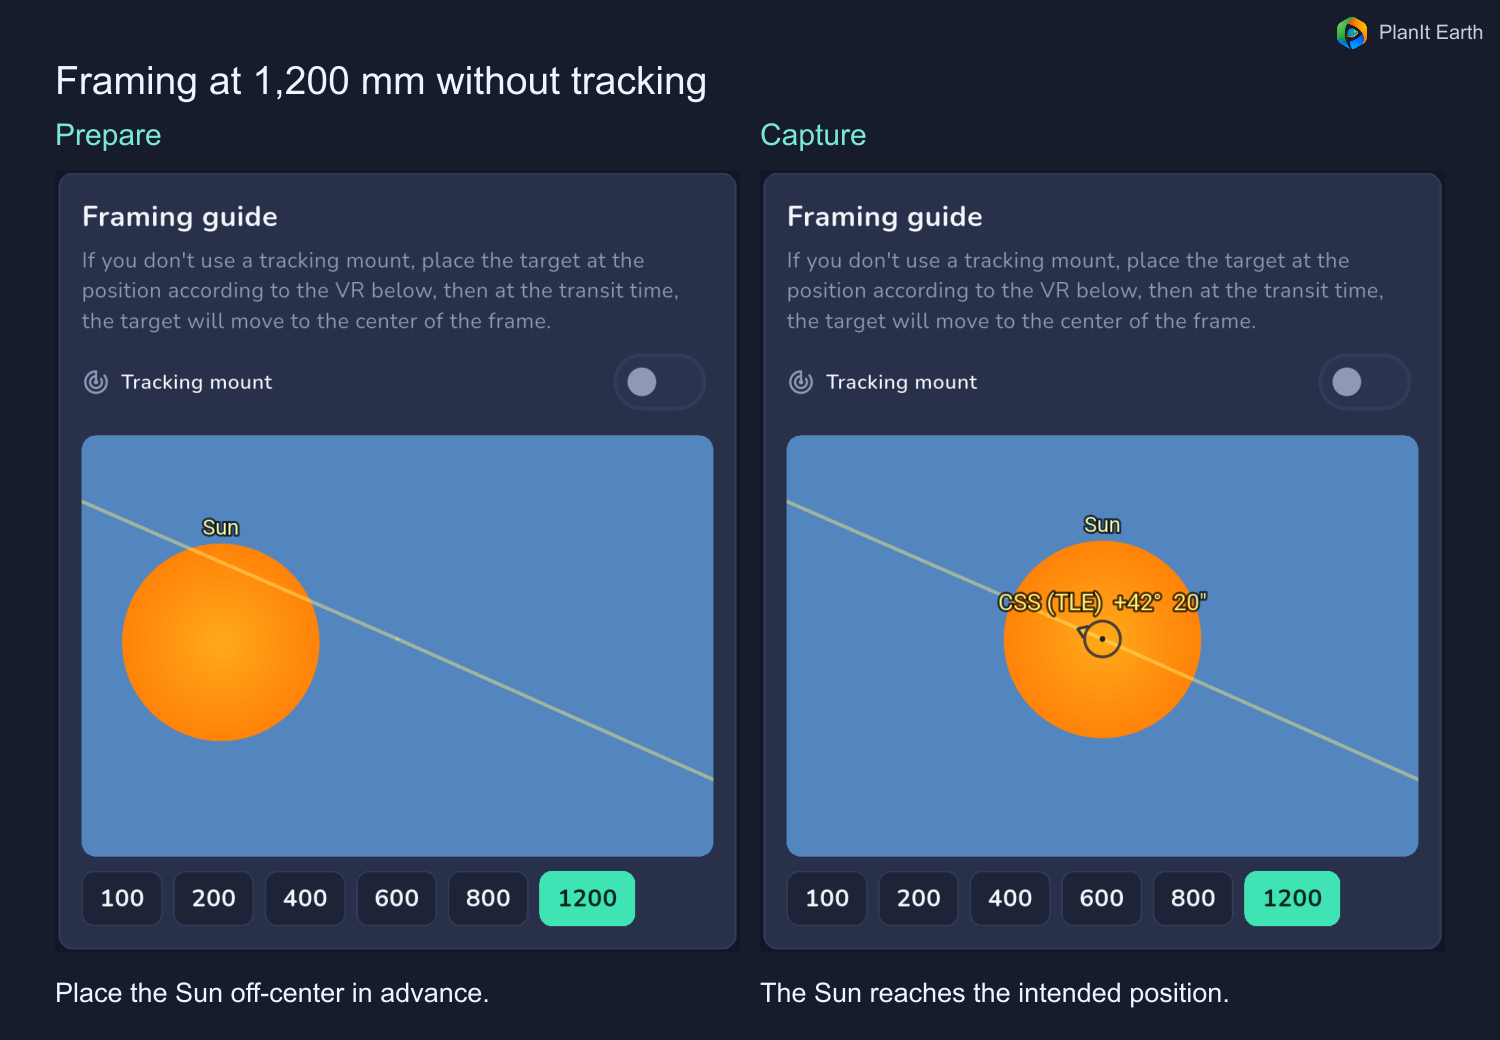
With equatorial tracking, confirm that the mount is already tracking the Sun or Moon, then enable the corresponding setting for the framing preview. The camera site and transit corridor determine how close to the disc center the station crosses. If the disc will drift out of frame, compose closer to the event time or use a wider field of view.
8. Solar and lunar transits
Solar transits
Fit a purpose-built solar filter appropriate for your equipment before pointing it at the Sun, and keep it securely installed throughout framing, focusing and shooting. Test focus and exposure on the solar disc. Check the suggested shutter speed and aim for an exposure short enough to limit motion blur. NASA solar viewing safety
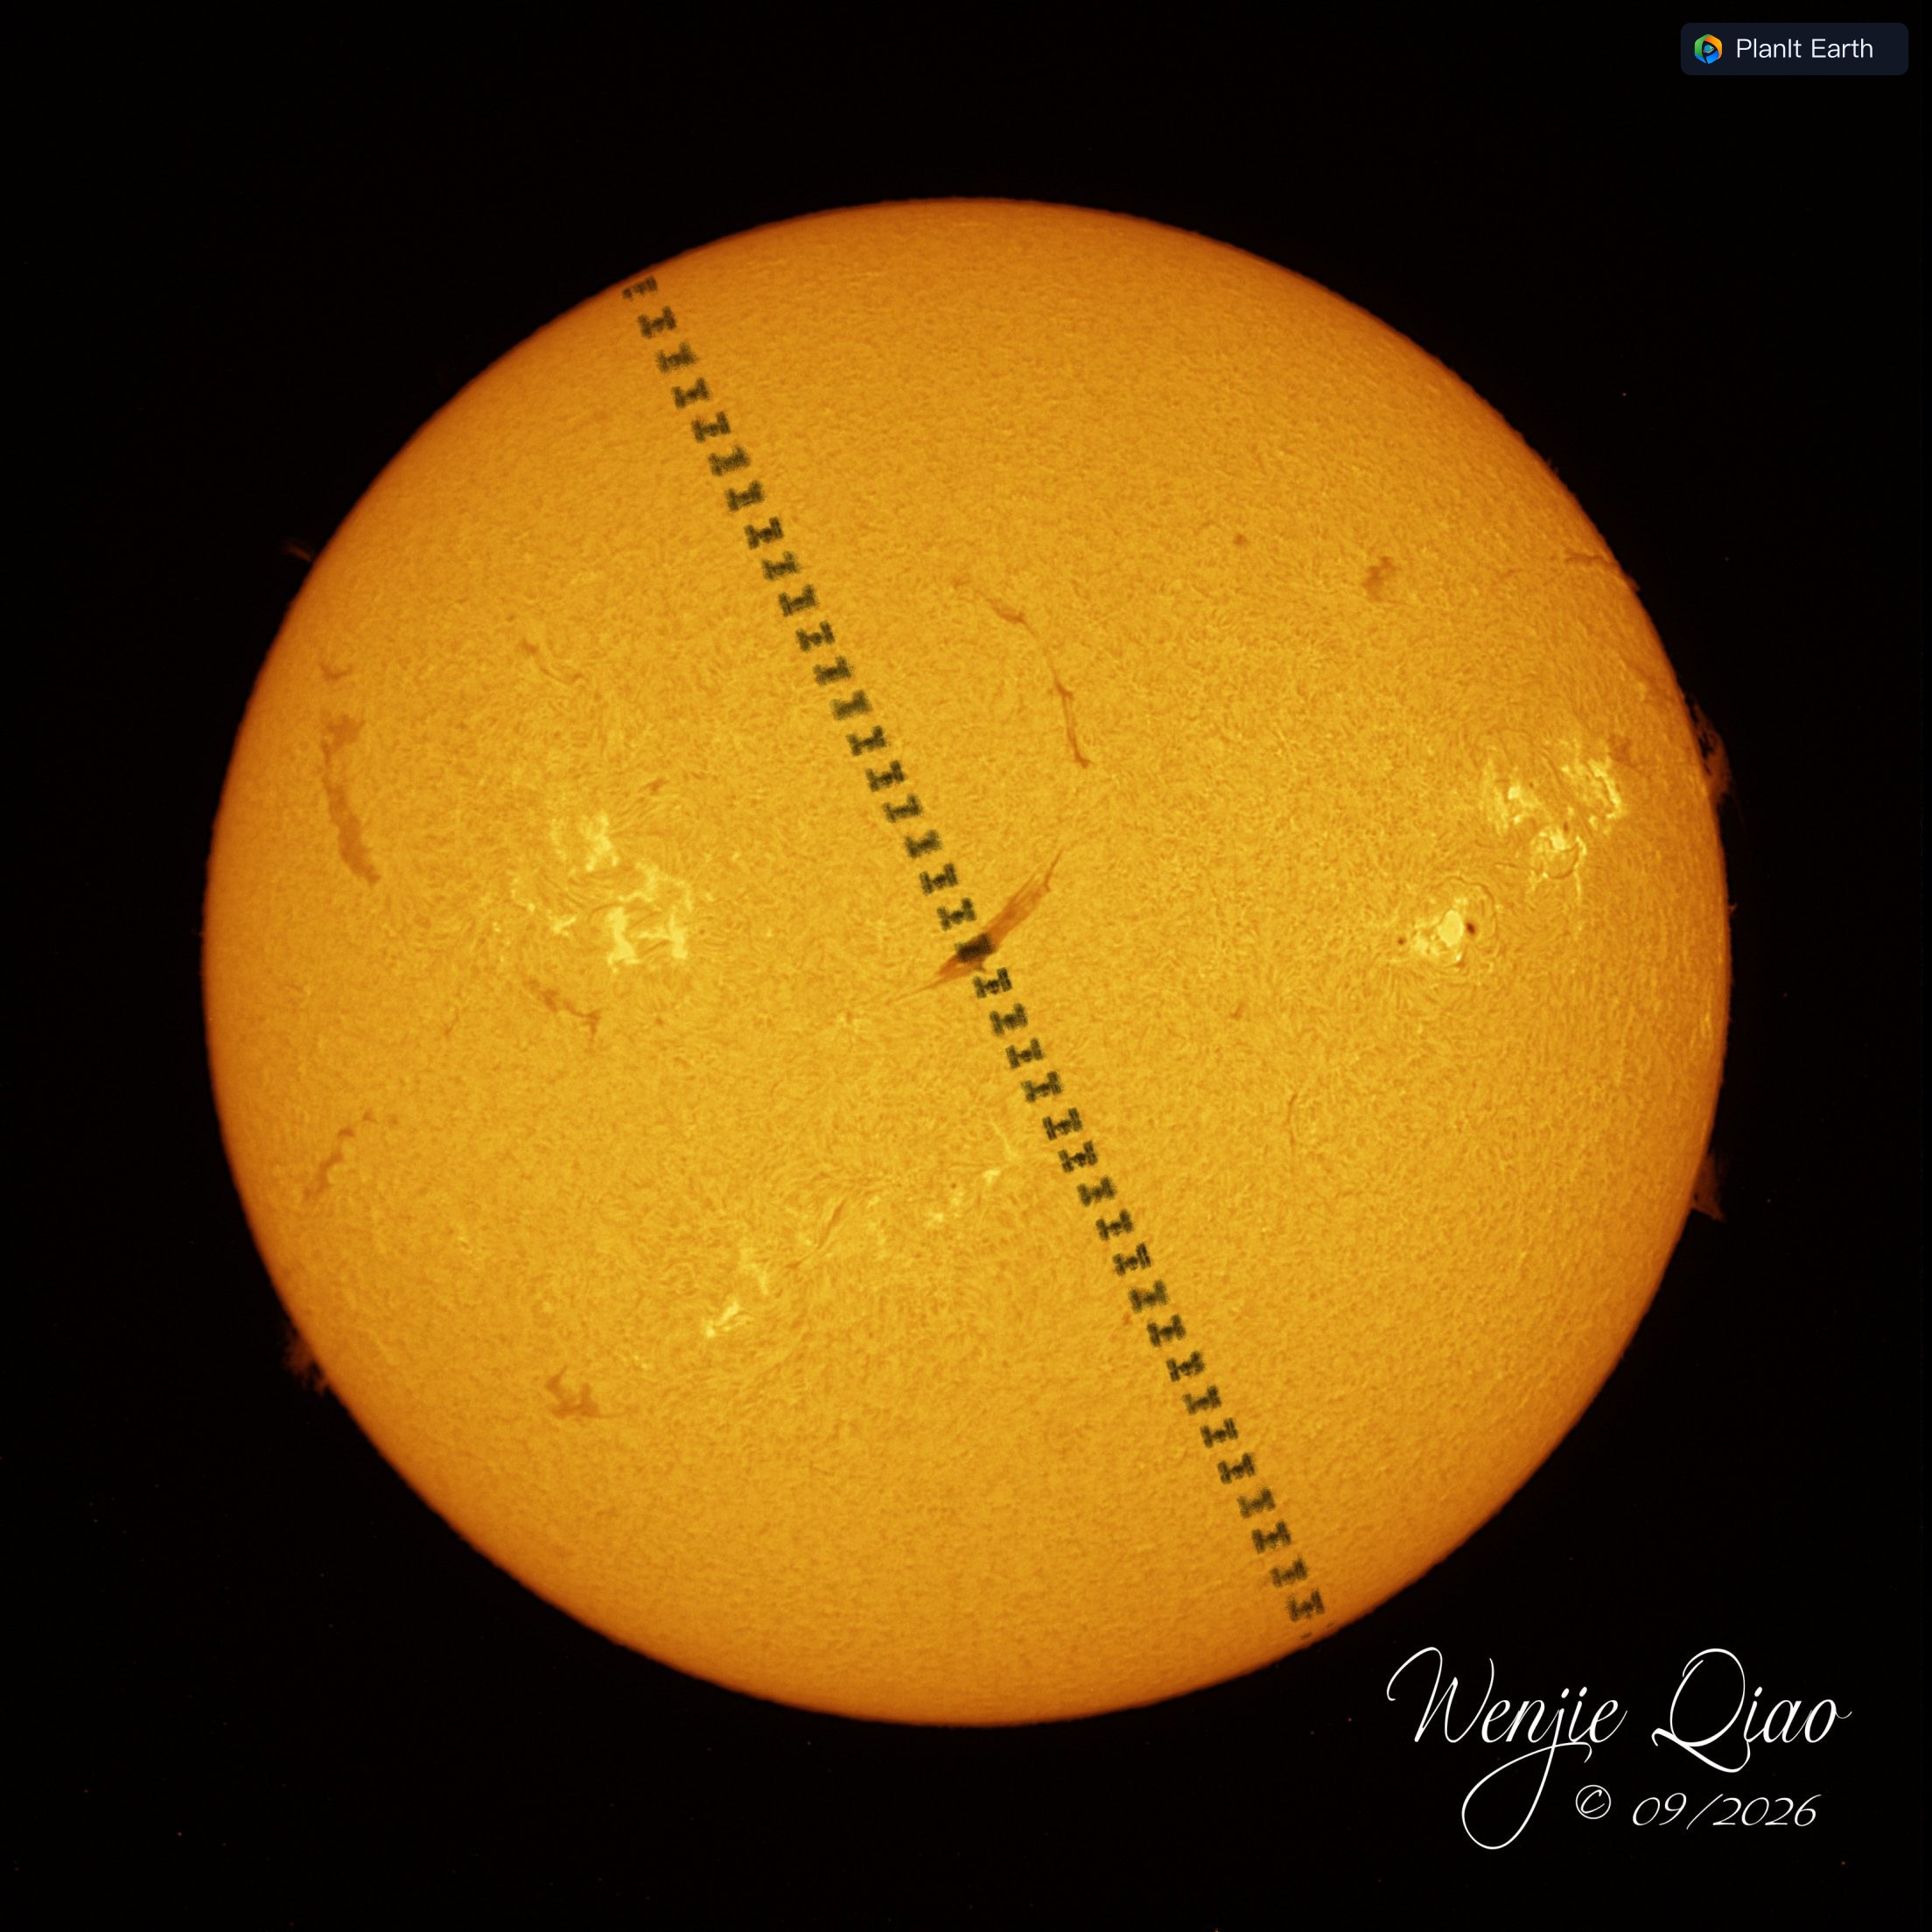
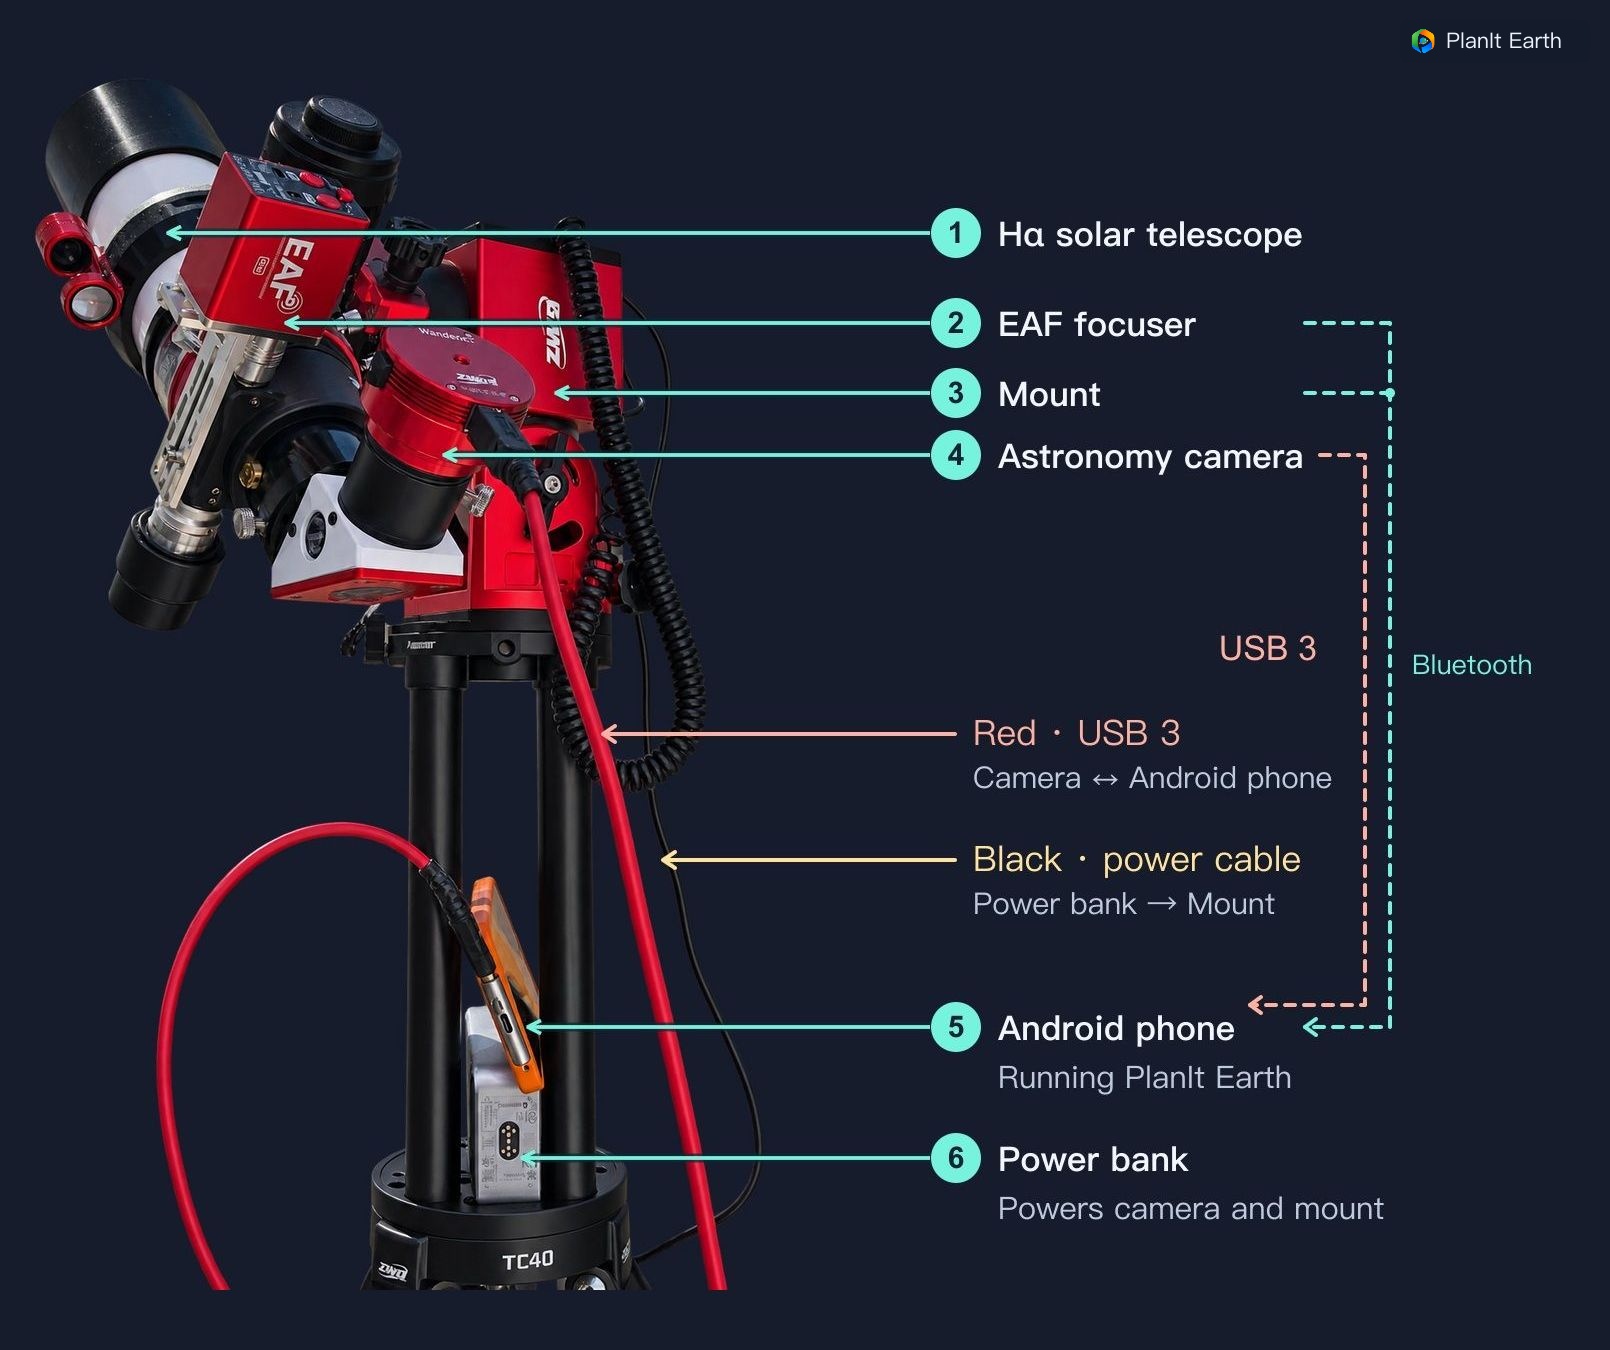
For composition, PlanIt Earth's VR can display GONG H-alpha imagery. In VR, open VR Settings, then Celestial and Sun Image. Select H-alpha for grayscale or H-alpha (Colorized) for color. Close settings to compare the expected station track with prominences, filaments and active regions.
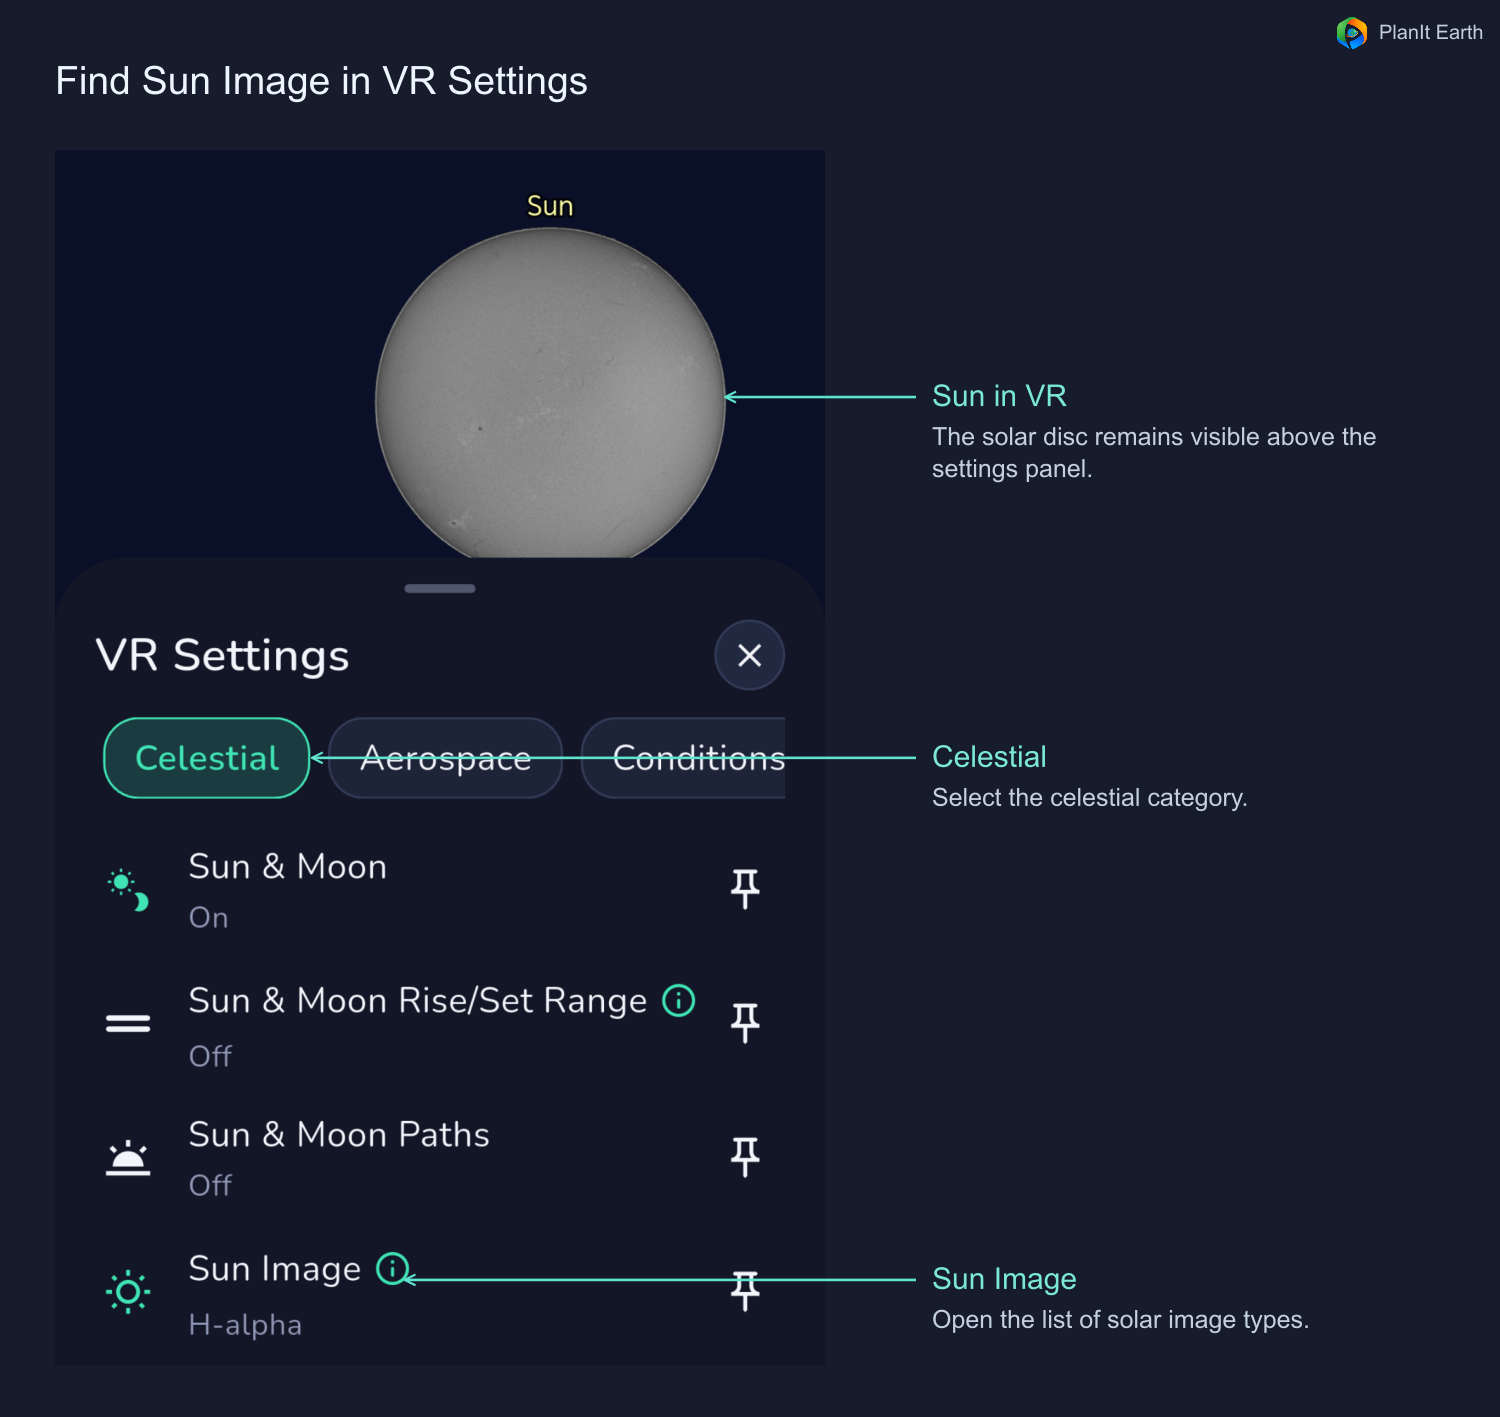
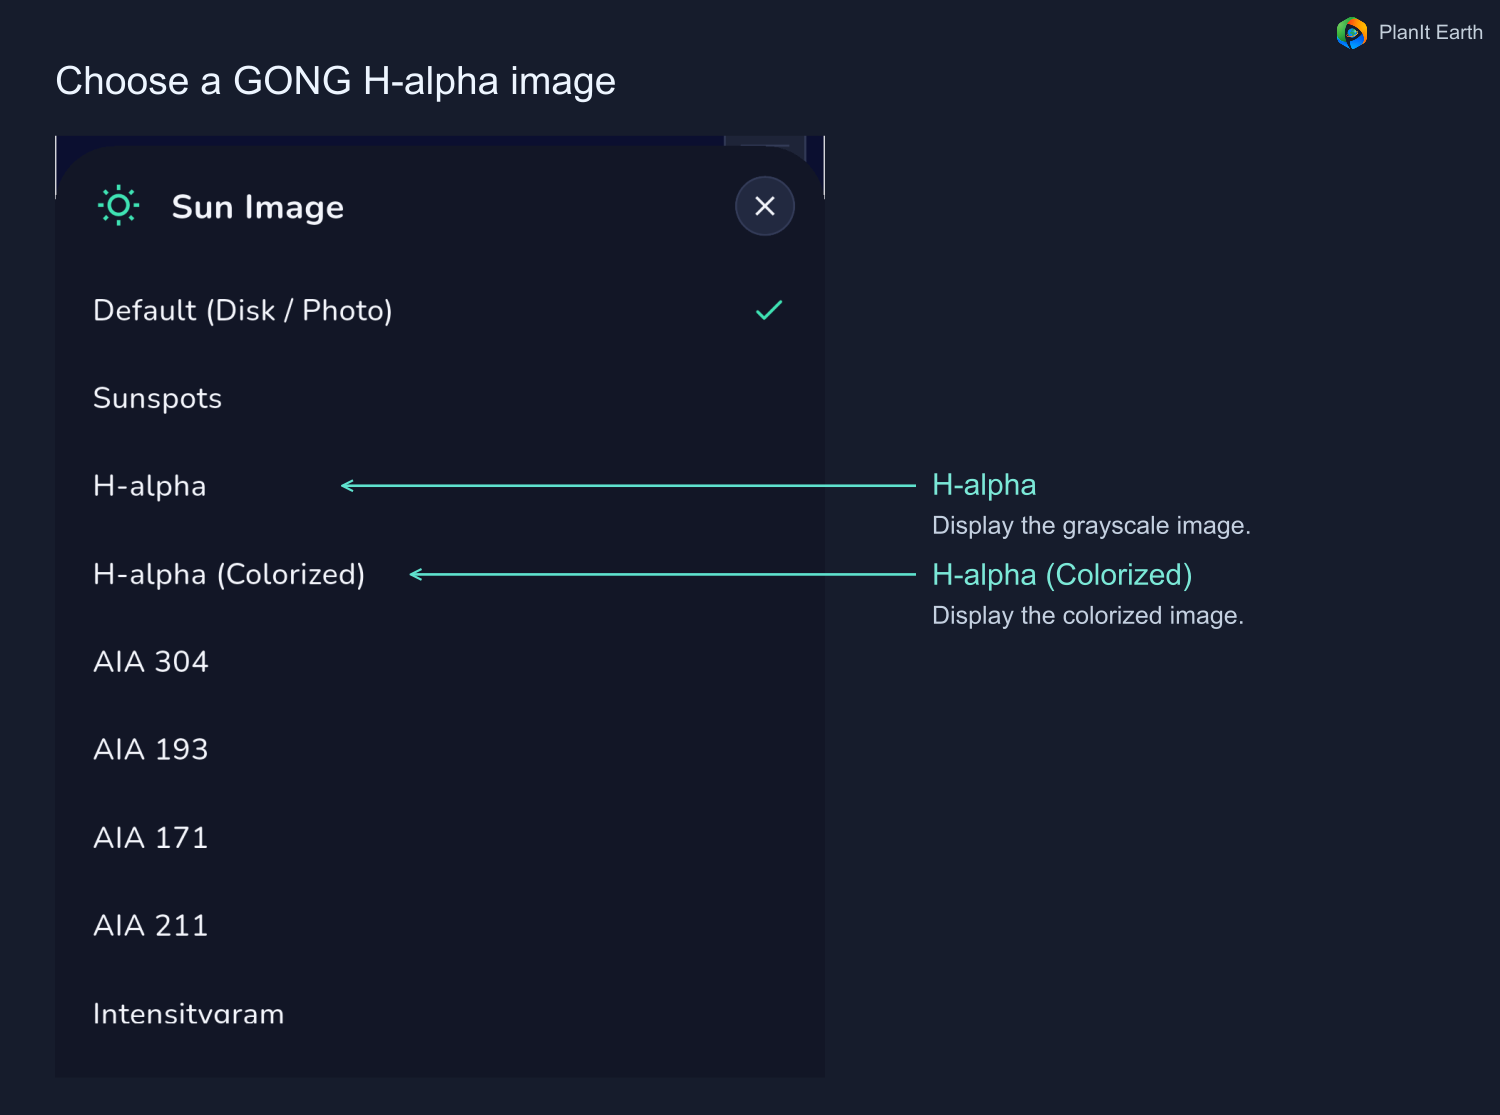
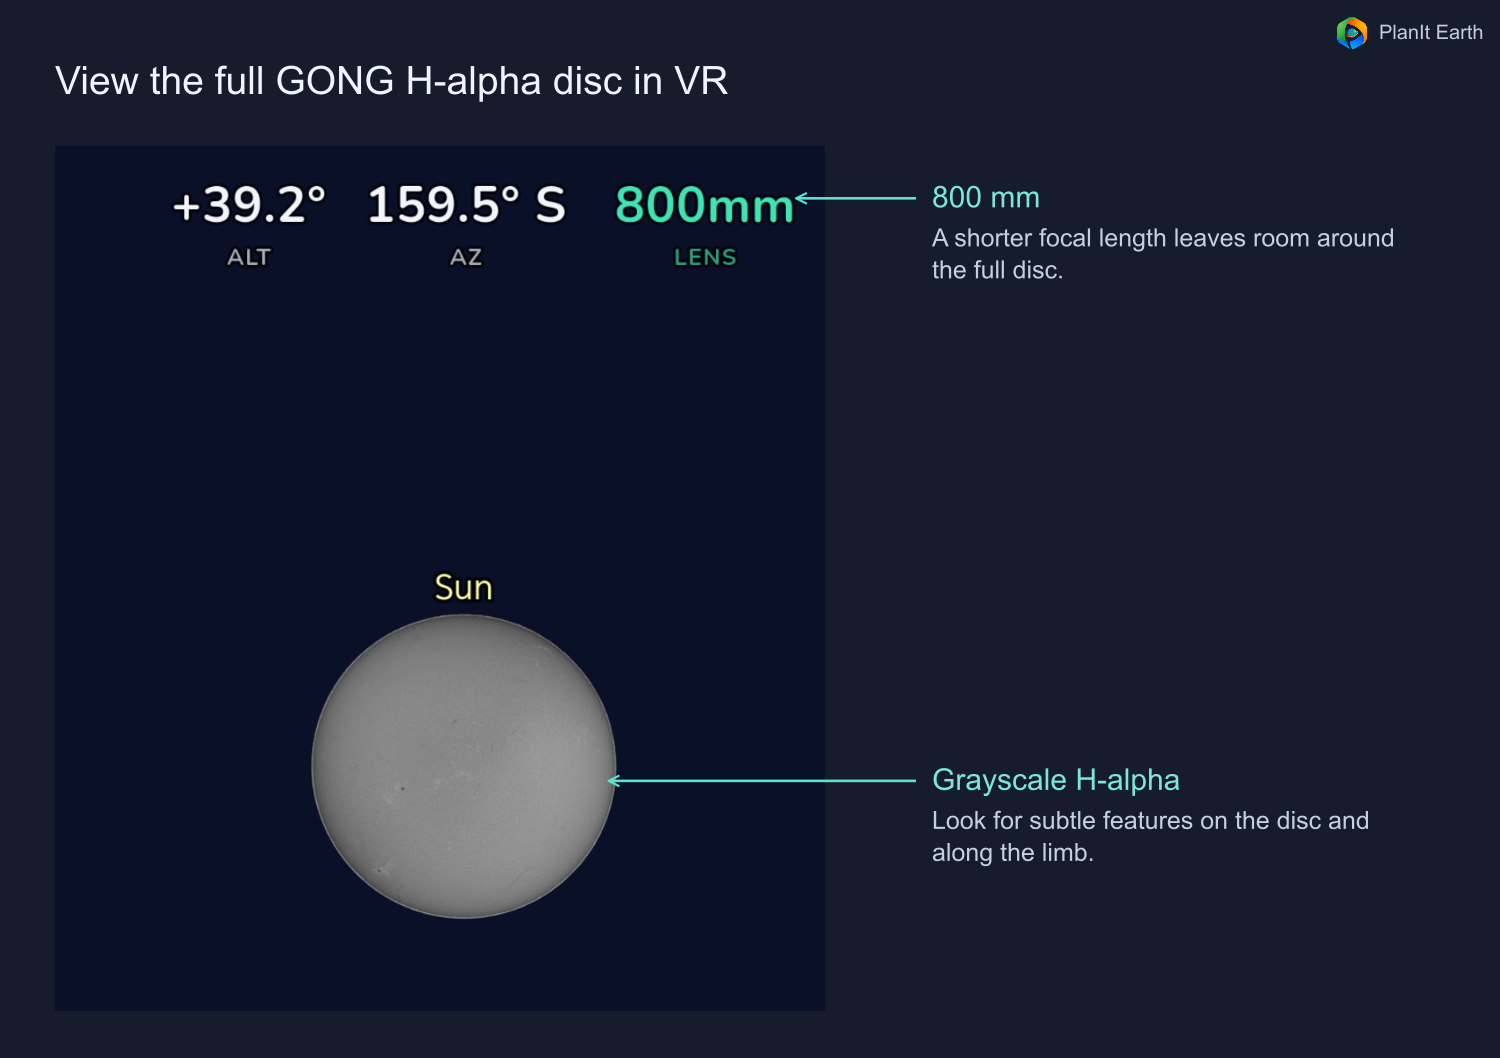
The imagery requires an internet connection and depends on the available observation times. The app can show an approximate future projection from an available image or fall back to its standard disc. Check the time note on the preview and review solar features again near the event. NSO/GONG H-alpha data
Lunar transits
Check the station's illumination in the event details. If it is sunlit, it may be visible in the sky outside the Moon as well as during the crossing. The app can account for the longer passage through the frame. Adjust exposure based on whether you want detail in the lunar surface or in the sunlit station.
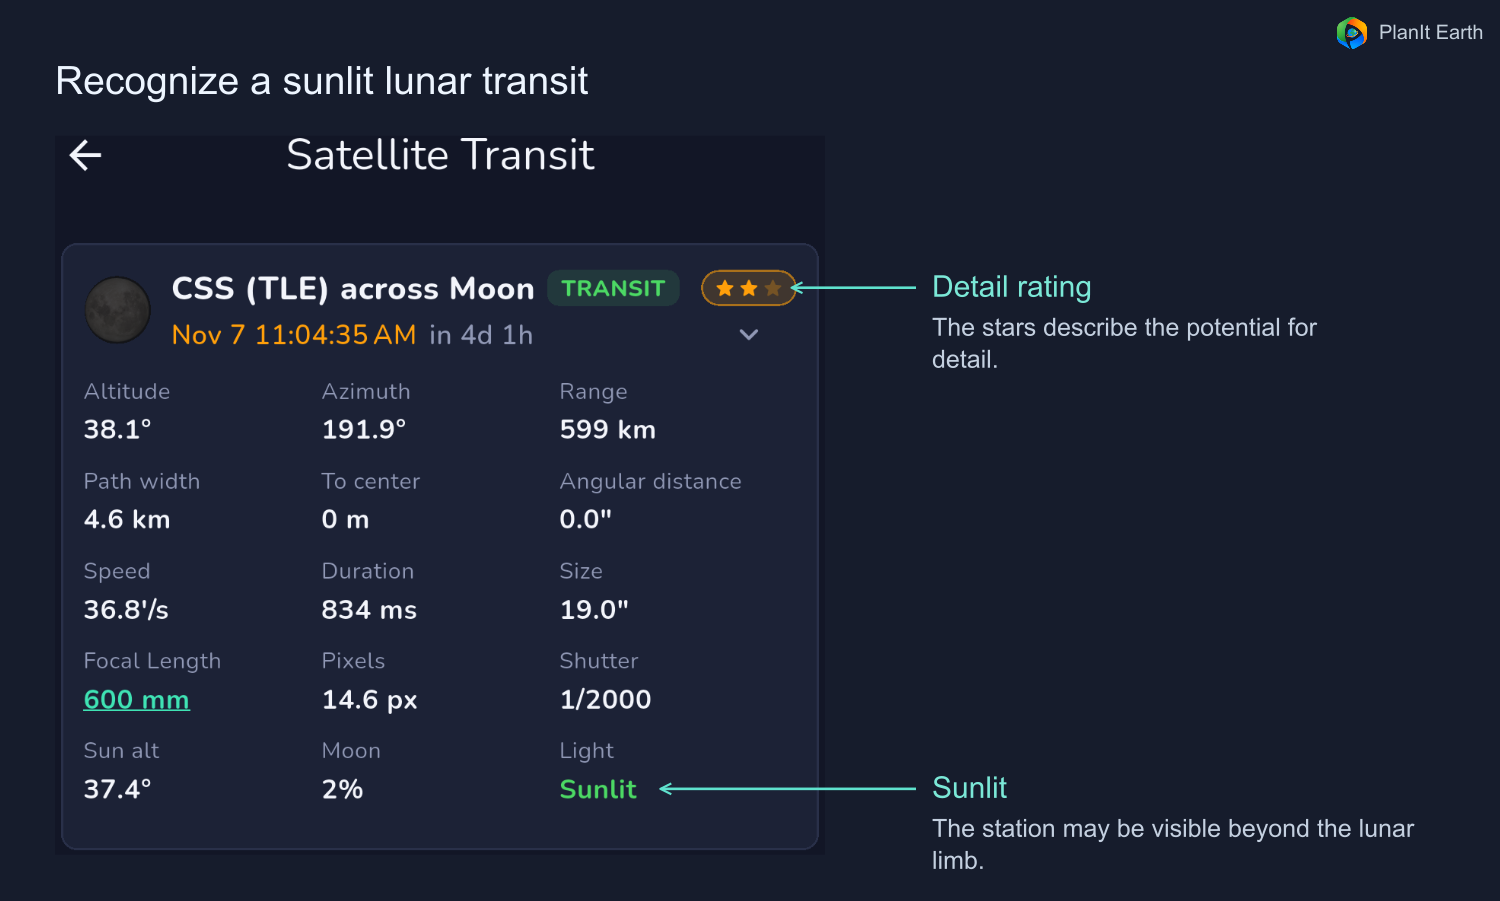
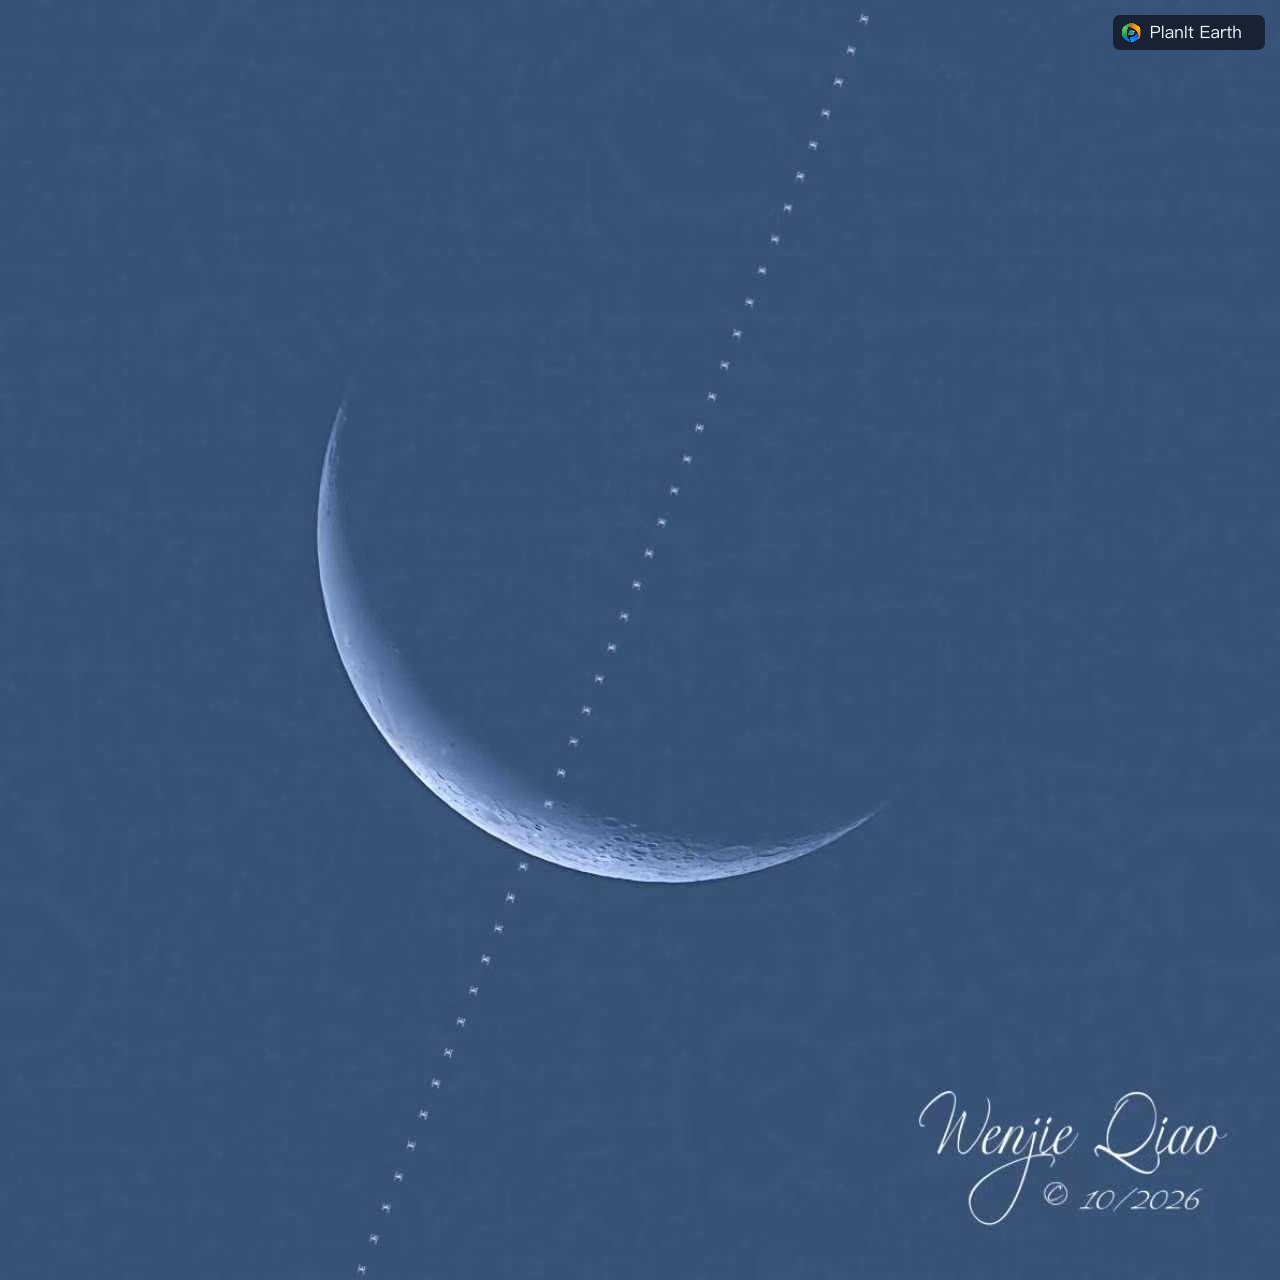
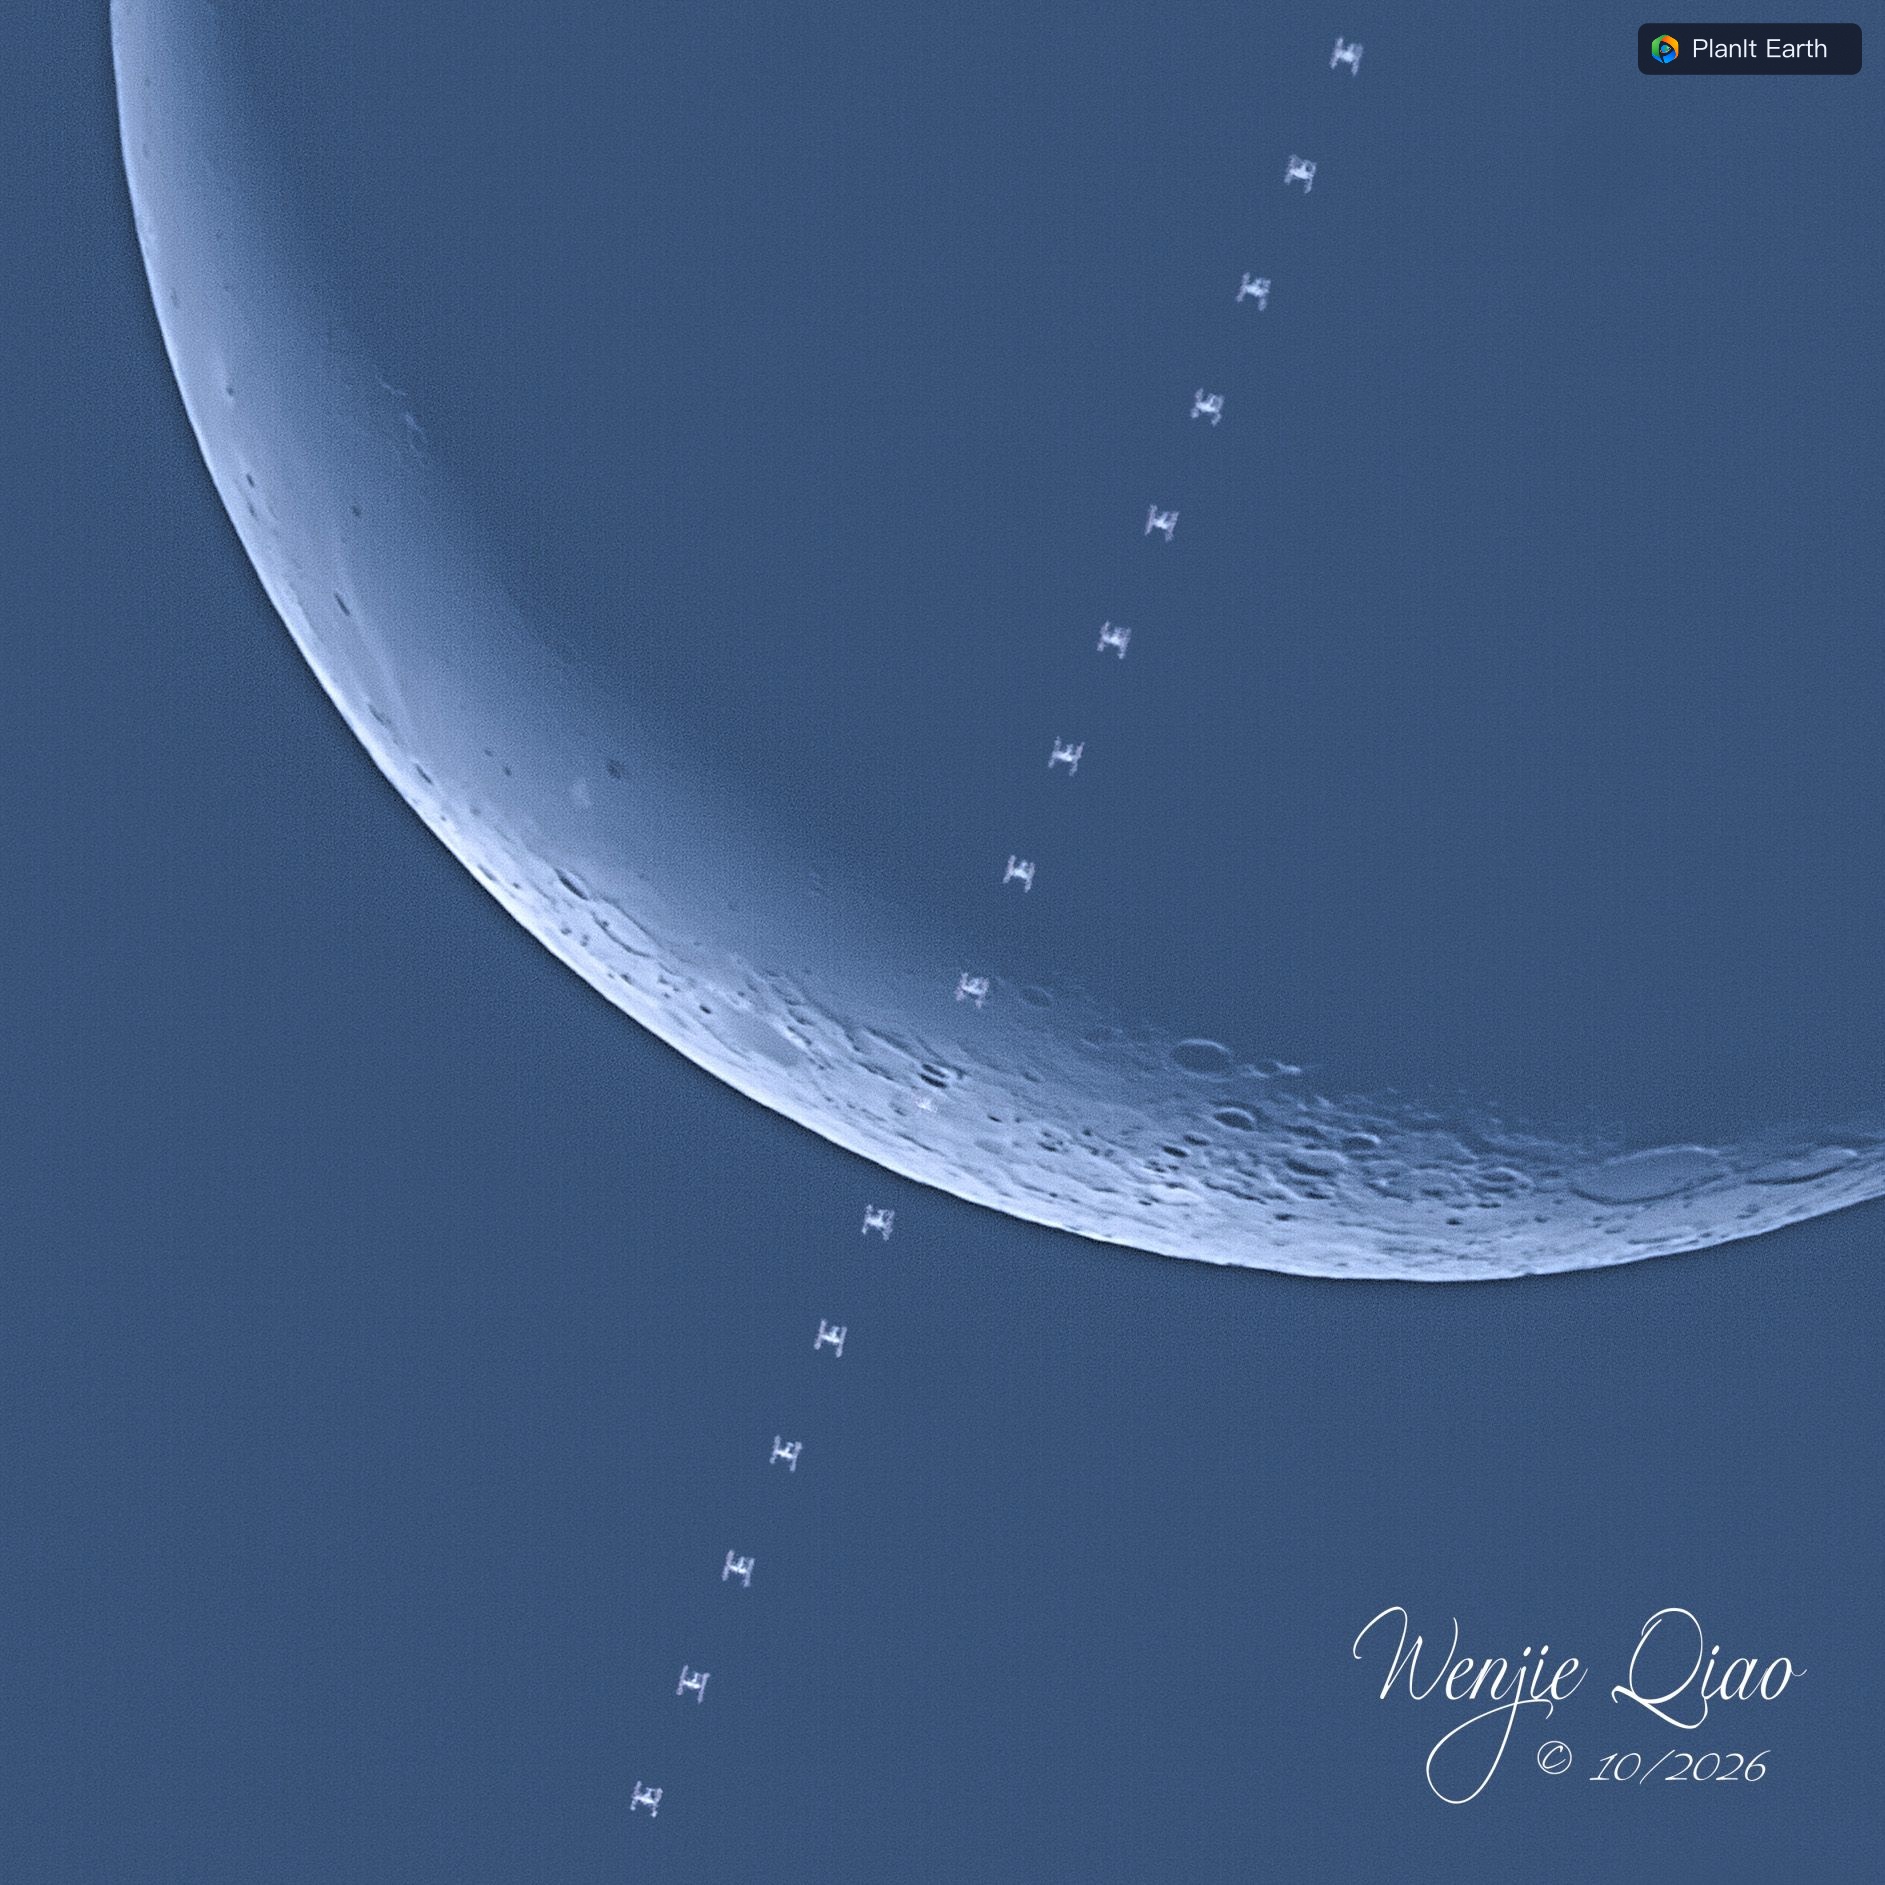
If the station is in Earth's shadow, expect a dark silhouette against the bright lunar surface and plan to cover the brief disc crossing. Consider the Moon's elevation, illuminated fraction, obstructions and atmospheric conditions when choosing an event.
9. Prepare the camera
Conventional cameras
Select the appropriate continuous or high-speed drive mode on the camera. Test a burst that lasts as long as the planned capture window. Check whether the buffer fills, whether writing slows the burst, and whether files actually save. Choose RAW, compressed RAW or JPEG according to your equipment and shooting needs. Check focus, exposure, battery and card space.
Astronomy cameras and SharpCap
Use a supported direct connection or the SharpCap bridge on a computer. For SharpCap, prepare the required Pro license, put PlanIt.SharpCap.Bridge.py and PlanIt.SharpCap.Detect.dll in the same folder with their original filenames, and configure the startup script according to the bridge instructions. Open the camera in SharpCap and connect to the computer from PlanIt Earth.
Check live view, exposure, gain, ROI, output format and save location. Make a test recording to confirm that the frame rate and disk writing hold up for the entire capture window. If your setup offers a pre-capture buffer, enable it and verify which frames the saved file contains. The scheduled capture window controls this workflow. A supported recording workflow may scan saved footage for the station afterward, so always check the original recording as well. Hardware connection guide · SharpCap setup in the airplane transit guide
10. Check before leaving and again on site
- Before leaving, choose an accessible candidate site and check weather, direction, apparent size and elevation. Pack filters, power, storage and spare cables.
- Near the event, refresh the orbit data, compare the available predictions and confirm the camera pin is still in the corridor. Review the capture padding.
- At setup, check focus, exposure, focal length, tracking, camera connection and save location.
- Before the countdown, rehearse and check the saved output. Return to the real event and time before choosing Start.
- After capture, review the full sequence and keep the original files for frame selection and stacking.