Get your own Google Maps API key for PlanIt Earth
A complete illustrated guide to creating, securing, and using a Google Maps API key with PlanIt Earth.
Most of PlanIt Earth works with no key at all: the map, 3D terrain in VR, ephemeris, weather, markers and plans. A Google API key adds the services Google charges for per use, billed to your own Google account: Google 3D Tiles and Street View as VR backgrounds, plus better search, elevation, time zone and an unlimited Google map on Mac and Windows. One key covers all of them.
Before you start
- Use a computer. The Google Cloud console is hard to use on a phone.
- You need a Google account and a payment card. Google asks for a card before any Maps API runs, even within the free allowance.
- Check coverage first. Google 3D Tiles covers only some cities. Open Google Earth on the web at the place you want to shoot. If it shows 3D buildings there, 3D Tiles is worth it. If it only shows terrain, PlanIt Earth's own 3D terrain already covers it.
- In PlanIt Earth, the same steps are at Menu › Settings › Service Providers › How to get a key › Google, with a button for each console page.
1Create a Cloud project
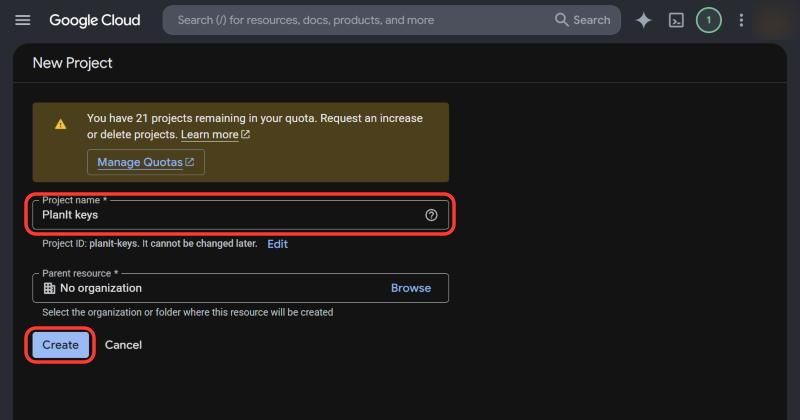
- Open console.cloud.google.com/projectcreate and sign in with your Google account.
- Enter any project name, for example
PlanIt keys, and click Create. - Make sure the new project is selected in the project picker at the top of the page.
A project is just a folder for your key and its bill. Nothing costs anything yet.
2Turn on billing
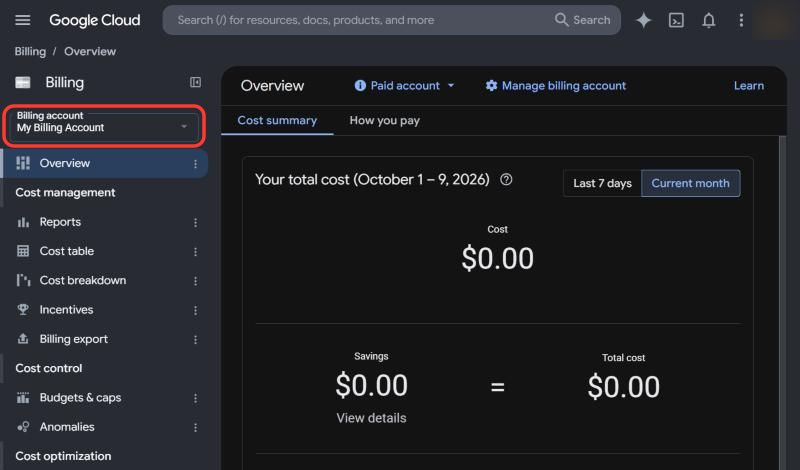
- Open Billing.
- Click Link a billing account (or Create billing account if you don't have one), choose your country and enter your card.
- Link the billing account to the project you just created.
Your card is charged only for use beyond the free monthly allowance.
3Enable the APIs
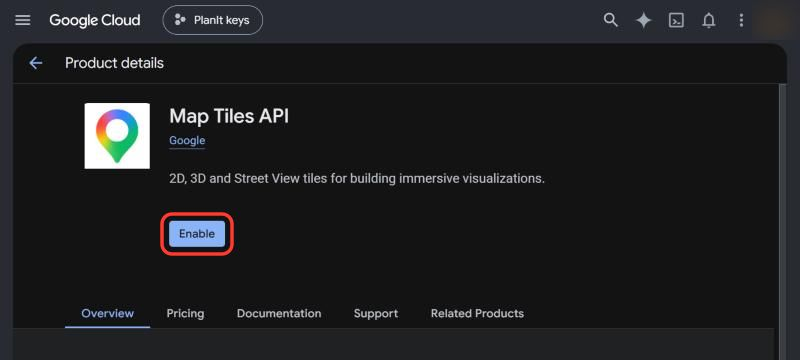
Open the API Library. Each API is switched on separately: search for it, open it, and click Enable. Enable all five, or only the ones for the features you use.
| Feature in PlanIt Earth | Enable this API |
|---|---|
| Google 3D Tiles in VR | Map Tiles API |
| Street View in VR, and the Google map on Mac and Windows | Maps JavaScript API |
| Search a place by name | Geocoding API |
| Elevation at a pin | Elevation API |
| Time zone near a border | Time Zone API |
For 3D Tiles, enabling “Maps SDK” is not enough; it has to be the Map Tiles API. Google may ask you to accept its terms once on the Map Tiles API page.
4Create the key
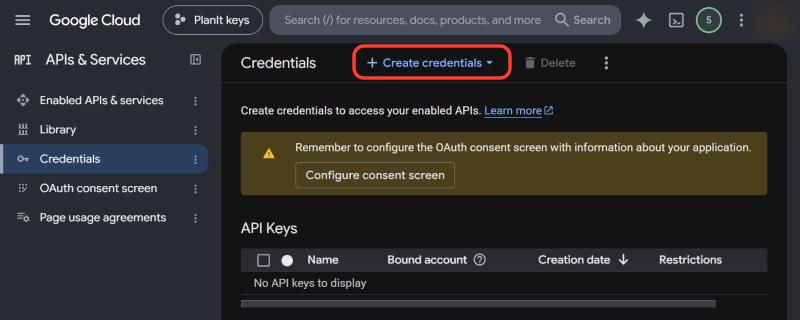
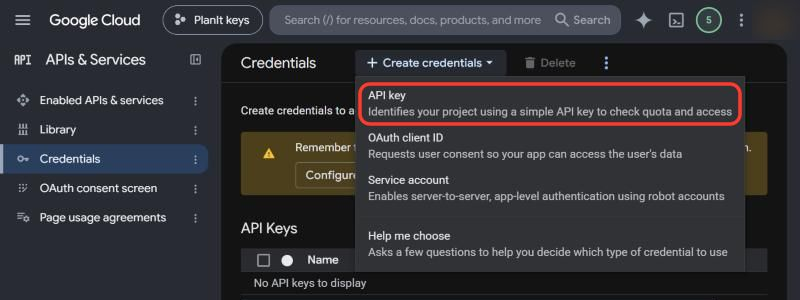
- Open APIs & Services › Credentials.
- Click Create credentials › API key.
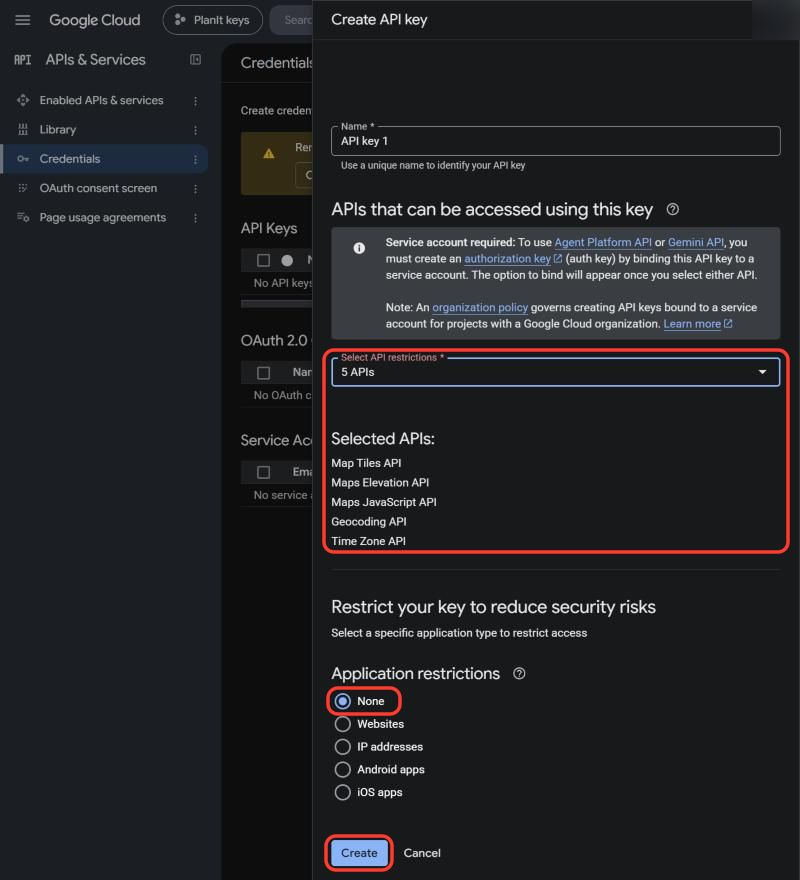
- In Select API restrictions, tick the five APIs from step 3: Map Tiles API, Maps JavaScript API, Geocoding API, Maps Elevation API and Time Zone API. Google now requires at least one API here, and a key limited to these five works with PlanIt Earth.
- Application restrictions: None. PlanIt Earth's VR viewer loads 3D Tiles from a page served locally on your device, so a key limited to Android apps, iOS apps or websites is refused (error 403), even though it looks valid in the console.
- Click Create.
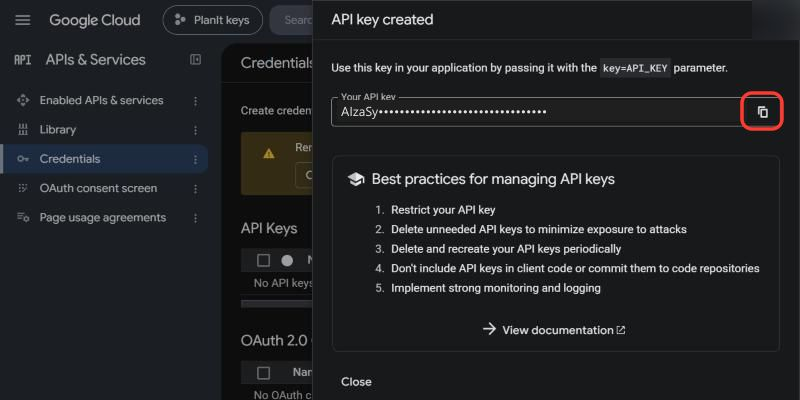
Copy the new key; it starts with AIza. A new key can take a minute or two to start working.
5Set a budget alert (optional)
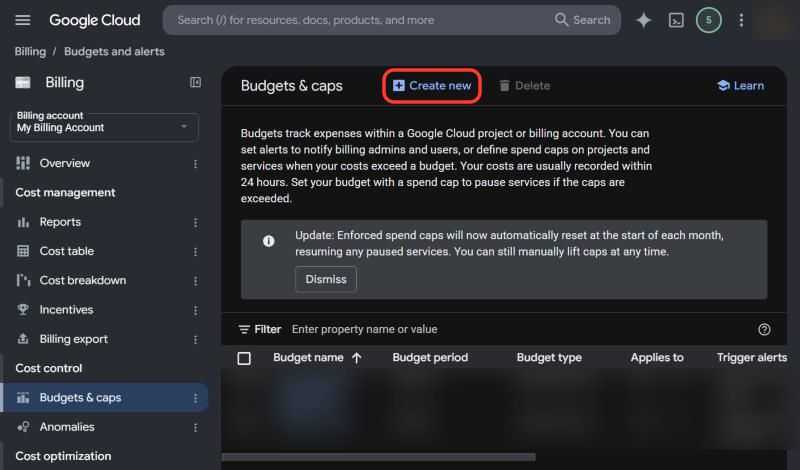
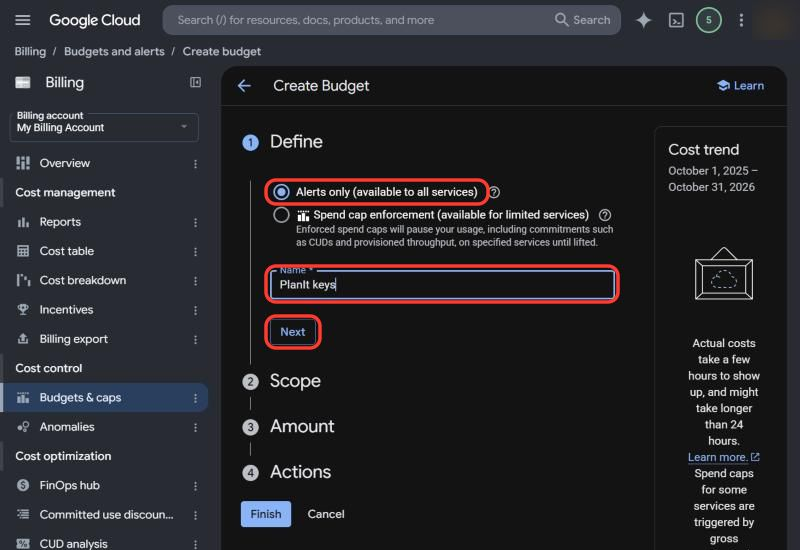
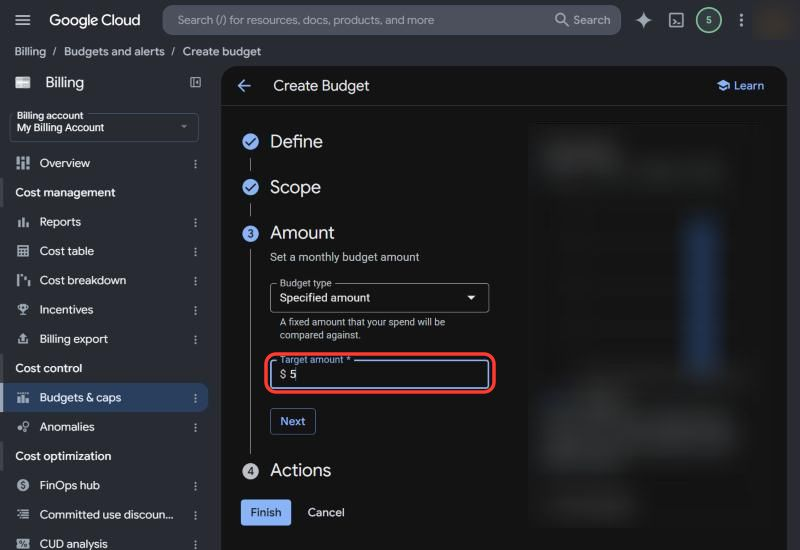
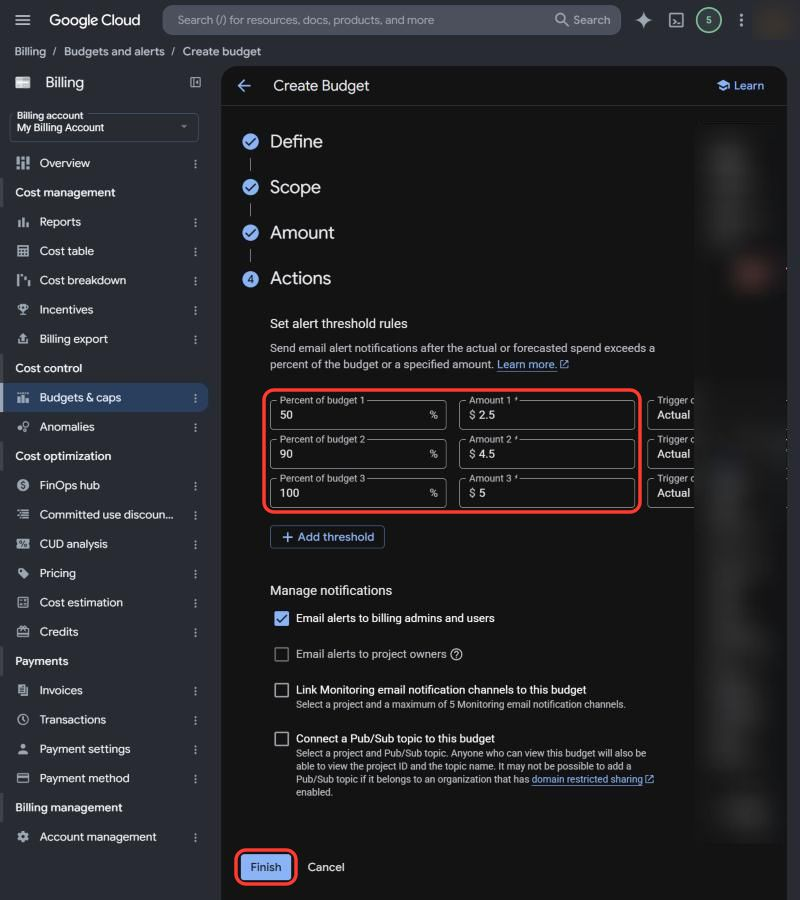
Protect the bill as well. In Billing › Budgets & alerts, create a budget, for example $5 a month, with email alerts at 50 %, 90 % and 100 %. For a hard stop, you can also set a daily quota on an API (APIs & Services › Enabled APIs › the API › Quotas). A quota stops the calls; a budget alert only sends an email.
6Verify the key in PlanIt Earth
- In PlanIt Earth, open Menu › Settings › Service Providers › How to get a key › Google.
- Paste the key into the box (
AIza…) and tap Verify Key. - The app shows which APIs are enabled on the key, then offers to save it to every Google service. Accept, and it confirms “Google key saved to N services.”
- Back in the list, each Google service shows Enabled and working, with a usage counter for the month.
What it costs
Free allowance per month on your own key, and the price after that (up to 100,000 uses a month; lower prices apply above that):
| Service | Free each month | Then |
|---|---|---|
| Google 3D Tiles | 1,000 VR sessions | $6.00 per 1,000 |
| Street View | 5,000 panoramas | $14.00 per 1,000 |
| Maps JavaScript (Google map on Mac/Windows) | 10,000 map loads | $7.00 per 1,000 |
| Elevation | 5,000 requests | $5.00 per 1,000 |
| Geocoding (search) | 10,000 requests | $5.00 per 1,000 |
| Time Zone | 10,000 requests | $5.00 per 1,000 |
One 3D Tiles session is one opening of the VR viewfinder with 3D Tiles. Looking around, zooming and moving inside that session cost nothing for up to 3 hours. Prices are Google's at the time of writing; check Google Maps Platform pricing for the current figures.
In the EEA: use Cesium ion for 3D Tiles
If your Google billing address is in the European Economic Area, Google won't serve 3D Tiles to your key. A free Cesium ion account streams the same Google Photorealistic 3D Tiles, and needs no payment card. The Community plan includes 1,000 sessions a month.
- Sign up at ion.cesium.com (Community plan).
- Open My Assets and check that Google Photorealistic 3D Tiles is there. If not, add it from the Asset Depot.
- Open Access Tokens and copy the default token (it starts with
eyJ). It works as it is. - In PlanIt Earth, open Service Providers › Google 3D Tiles, tap EEA (European), paste the token and tap Verify Key.
Keep using your Google key for Street View, search, elevation and time zone.
Troubleshooting
| What you see | What to do |
|---|---|
| Enabled but rejected, or 3D Tiles shows 403 | Set Application restrictions to None; make sure the five APIs are ticked under API restrictions; check billing is linked to this project and the Map Tiles API is enabled. |
| 403 with an EEA billing address | Use a Cesium ion token for 3D Tiles (above). |
| 3D Tiles shows 404 | Enable the Map Tiles API in the same project as the key. |
| 400 or “API key not valid” | Copy the whole key again, with no spaces. |
| Enabled but unreachable | A network problem (VPN, firewall or captive Wi-Fi), not the key. Try another network. |
| Cesium ion token loads nothing | Add Google Photorealistic 3D Tiles to My Assets. |